This just might be my favorite use of Sequins. Did you know you can use Cricut Infusible Ink on a Sequin Pillow Blank to create really fun and interactive pillows. Take a look at how amazing this pillow turned out.
If you have a Sublimation printer, you can create similar pillows with even more customizations. Check out this one I made for my grandson.
The kids love their pillows! I love how easy it was to create fun pillows that were customized especially for them. Evie requested a pillow with Elsa (Frozen) pillow. I was able to create exactly what she wanted in less than 5 minutes.
These are going to make amazing gifts for the holidays, kids parties and let’s face it, that Maker pillow is a piece of Decor in my craftroom.
If you want to make a (or ten) sequin pillow of your own, watch my step by step tutorials below. I will walk you through using Cricut Infusible Ink in the first video and using a Sublimation printer in the second video.
I have been wanting to create this drawstring tote bag tutorial for awhile now, but I got sidetracked with mask making. I thought it would be a fun time to create this quick and rather easy tote bag.
I used this great PUL fabric on the inside that makes it water resistant and easily wipeable, which means, it could easily double as a make up bag, lunch tote or use it for just about anything you’d use a tote bag for. The finished size measures about 7 x 6 x 10″.
I have a step by step tutorial linked below. If you have a Cricut Maker you can cut all of the pieces with your Maker. No Maker, no worries. I have a PDF with the dimensions here, you can easily handcut each piece.
So, are you ready to make a couple of cute drawstring totes? I bet you can’t make just one! I know, I couldn’t! If you make one, please post on social media and tag me. You can find all of my links in the video description. I love to see what you are making!
Well hello there my Urban Scrunchie friends! I am still at it. I can’t quit making these really quick and easy headbands using my Urban Scrunchie Mini Template.
I mean who doesn’t love to put on a bright, happy headband and make a statement. You can mix and match the headband bows by simply untying and putting it on a different headband. I cannot wait to see Evie sporting one, but since my cute model isn’t here, you’ll have to settle for me :). Sorry about that, but I wanted you to see just how fun they are.
I just LOVE them! They make me happy just looking at them.
I used the same Mini Template that I used for the Mini Urban Scrunchies. You can find the Original Urban Scrunchie Post here. I love the fact that you get two projects from the same template. Keep in mind, the Original Template was much larger and longer. I used the MIni here.
Here are other ways to use the same template:
Compared to original Urban Scrunchie.
I see headbands in the girls’ stockings this year.
Are you ready for the step by step tutorial? I thought you might be.
Check out this video for 3 more ways to use the Urban Mini Scrunchie:
I am excited to say I am going on a “girls’ trip” soon! I thought it was time to add a little cuteness factor to my travel bag. I used Cricut Premium Vinyl and my Cricut Maker to make this fun little bag.
You can absolutely use the Cricut Explore to make this as well. I started with a blank toiletry kit like this one and used my Design Space File. This is a great beginner project for every Cricut user.
I will walk you through every step of the way in the detailed, step-by-step tutorial below.
*Disclaimer: Links above are affiliate links. By clicking on these links I may earn a small commission at no cost to you. Some products may have been provided to me by vendors, however, all opinions and reviews are strictly my own.
Hello and thanks for stopping by! Today, I have a new make up pouch tutorial for you. We have all seen this style of make up bag, but did you know how EASY they are to make on your own?
I even added a vinyl lining which makes it easy to wipe up any spills or powders that can get inside a make up pouch. It’s not just me that is messy, right?
Or leave the vinyl out, like the one above and use it for your jewelry when traveling or your child’s legos… there’s never a shortage of uses for a pouch!
If you don’t have a Maker, yet, never fear because I have a work around for you. I bet you have a dinner plate and that will work just fine, too!
You can whip these up in time for Christmas gift giving! They take very little supplies and picking the fabrics is half the fun!
I mean, c’mon! We all have THAT friend who is dog crazy! You know, the one who hangs signs in their house about how their dog lives here, not you. The ones who dress their dogs, kiss their dogs on the lips, let their dog have a lick of their ice cream… you know who I’m talking about.
We love them anyway! (Just a little side note.. I might BE THAT FRIEND). Well, now you have a mission for your dog lovin’ crazy friend. Make them a matching oven mitt, hot pad out of this cute Fabric Editions Fabric from Walmart.. and it’s only $0.97! All you need is two fat quarters for the oven mitt and you can use the left overs to create this reversible matching hot pad.
How fun!
The fur… I die! You know you want to make this just so you can have a fur cuffed oven mitt on Christmas morning. Want to know how to make the oven mitt? It was one of my first maker sewing projects. I’ve got a tutorial and a FREE pattern ready for you. Don’t have a maker, cut out the pattern in cardstock and then use that for your pattern! I didn’t use the fur in this video, but you can either glue it on, or sew it on. I found the strip of fur at Joanns in the craft aisle (over by the bag making supplies, feathers, etc).
Well hello there! Thanks for dropping by! I have been having so much fun creating these drawstring bags. I literally stalked my Walmart to find these $0.97 fat quarters by Fabric Editions. Last week, I hit the jackpot!
I immediately knew what I wanted to make, but I also wanted to display the fat quarter rolls for the holidays, so this project turned out to be a two for one!
You can open the drawstring and fold it down and voila… it’s an instant “work from me” bag. When you’re all finished, simply cinch it up and everthing is nice a secure on the inside.
I’ll be adding some of these to my Etsy Shop. I have created a Design Space pattern for this and hope to share that as soon as I can find the time to record a video tutorial.
Check . your local Walmart for these fantastic finds! What I don’t use this year, I will simply cinch up in this fun little holiday bag for next year!
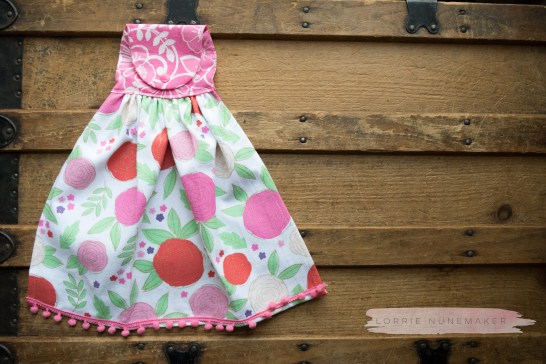
Thanks for stopping by. Today I am showing you how to create a decorative towel hanger with your Cricut Maker! Don’t have a Cricut Maker – don’t worry, I’ve got instructions for you, too.
I remember growing up that my mother and grandmother often had towels hanging from the front of the stove. They were attached with some of grandmother’s handy dandy killer crochet skills. Apparently, a skill that I did not inherit! 🙂 .
I wanted to create a towel hanger to keep a certain someone (sorry, Doug) from grabbing my pretty decorative towels and wiping up spilled milk on the counter. Just sayin… PAPER TOWELS! I digress.
I decided to create a pattern in Cricut Design Space (you can grab it here) and create my very own modern version of Grandmother’s Crochet’d towel holder.
I think this is the perfect gift for most every home. It would be great fun to make one for each season/holiday and gift them as a set.
I used the Cricut EasyPress to create this Rae Dunn Inspired Flannel towel holder. The Easypress also helped me create holiday towels for Christmas like this one
and this one. Excuse Wrigley… he thinks hes a prop.
I just love the fact that you can get two towel holders from 1 towel.
I added a little pom pom trim to this one! A girl has to have pom poms in her life, right?
I bet you can guess that I have a step by step tutorial for you and you can help yourself to the pattern above.
*Disclaimer: Links above are affiliate links. By clicking on these links I may earn a small commission at no cost to you. Some products may have been provided to me by vendors, however, all opinions and reviews are strictly my own.
I can’t believe I’m already thinking about the Holidays! Where has this year gone? I want to get things ready a little ahead of time so I can sit back, sip eggnog and enjoy the kiddos this holiday season, so I went ahead and created this year’s personalized ornaments!
I am still working on those flannel scraps and decided to put them to use with an embroidery hoop!
To step it up a notch, I decided to create some wonky stitching around the edges, but this step is totally optional.
I think the stitching adds a little character and the handmade look, which I love.
I used a little HeatNBond, applied with the Cricut EasyPress to apply the canvas letters. You can see I reversed it on the letter D and used the flannel for the letter and the canvas for the background.
It’s a really easy way to create personalized ornaments for co-workers, family and friends!
Simply add an elastic string to the hoop closure and a little hot glued bow and voila… you’re all done! On to the next project.
Here’s a quick video! (Products used linked below the video)
*Disclaimer: Links above are affiliate links. By clicking on these links I may earn a small commission at no cost to you. Some products may have been provided to me by vendors, however, all opinions and reviews are strictly my own.
Jingle Bells by Kevin MacLeod is licensed under a Creative Commons Attribution license (https://creativecommons.org/licenses/by/4.0/)
Source: http://incompetech.com/music/royalty-free/index.html?isrc=USUAN1100187
Artist: http://incompetech.com/
Hello! Happy Saturday! Speaking of Saturday… next weekend I am headed to a wedding reception for a married young couple. I wanted to give them a little bit of handmade fun to help celebrate the occassion. I came up with this wood themed set.
I used the Cricut EasyPress 2 to add all of the personalization! It looks like its engraved or wood burned, but it’s not!
I thought about the fact that soon they would be celebrating their “First Christmas as Mr. and Mrs” and thought they needed a keepsake…. and besides, it matches!
The EasyPress 2 makes it so easy to customize all of your handmade goodies (and we won’t tell if you personalize store bought items, too! ) 🙂
These gifts are “made with love” and I can’t wait to share them with the Bride and Groom.
You know, I had to make a tutorial to go along with this! I think this is a really fun and really inexpensive gift idea and with the holidays around the corner, you just might want to grab some wood slices and create your own!


 If you prefer the


 Well hello there! Thanks for dropping by! I have been having so much fun creating these drawstring bags. I literally stalked my Walmart to find these $0.97 fat quarters by Fabric Editions. Last week, I hit the jackpot!


 Apparently, a skill that I did not inherit! 🙂 .


 I added a little pom pom trim to this one! A girl has to have pom poms in her life, right?


