Sublimation Projects of the Week

When I first bought my Sawgrass sublimation printer, I knew I wanted to make quick and easy gifts for friends and family. I try to continually look for fun things to sublimate. I make them throughout the year and tuck them into a little bin. When a birthday, anniversary or just a special day for any occasion rolls around, I can easily look into the bin of sublimation goodies and I’ve got the perfect gift. Let’s take a look at my most recent creations.

I wanted to create a fall bib that could be worn for the season, rather than a Halloween bib that is limited to a much shorter time period. This image was exactly what I was looking for. I love non-traditional holiday colors, like this blue. The bib blank is a great size for toddlers.

Next up, I created another fun sublimation project utilizing this burlap-like wine bag (you can grab one and save 15% off your order by using code 9PSR5). I found this FUN “in case of emergency design” HERE. This will be a great project for holiday hostess and co-worker gifts.

If you’d like to see the step by step tutorials for either of these projects, just click the tutorial below.

In the Hoop Candy Cane Holders by ScissorTail Stitches

I had so much fun creating these candy cane holders by ScissorTail Stitches.

They are a little gift all by themselves. How cute to leave one in the mailbox for your mail person, make them for neighbors, students, co-workers, etc. They are a really easy in the hoop project. Simply select all of your colors and in no time you will have some really cute candy cane holders.

I absolutely love the detail Scissortail Stitches includes in her digitizing. The tree texture, the detail in the bird’s scarf, etc. are signs of a well digitized file. I couldn’t be happier with the results.

You will need a 5 x 7 hoop to make these (unless you have software to resize them). I used my Ricoma EM1010 mutli-needle embroidery machine, but you can make them easily with a single needle as well.

I made a video in case you want to try a few of these cuties.

How to Subimate a Plushie

Hello Teddy Bear Cuteness! Ace and Evie are going to go nuts over these Teddy Bear Plushies. First of all, they are plushies and second of all, they have their favorite characters on them. I bet you can guess who likes each one, but I can almost guarantee they will still fuss over them.

These plushies with sublimatable T-shirts are from JP Plus. You can get them here. They also have a rabbit, dog and an elephant. I purchased two of the the bears just to keep the arguing to a minimum (I know some of you can relate). Use code 9PSR5 and get 15% off your order (be sure and add the shirts to your order – they don’t come with the plushie).

As always I used my Sawgrass SG500 Subimation Printer and my cute pink heat press. Heat presses don’t have to be an eyesore in the middle of your creative space.

I put together a quick video to show you just how easy they are to customize. Leave me a comment and let me know what you will put on your plushies. Will you get the Bunny, Dog, Elephant or Bear?

*Disclaimer:  Some links above are affiliate links.  By clicking on these links I may earn a small commission at no cost to you.   Some products may have been provided to me by vendors.  All opinions and reviews are strictly my own.

How to add Embroidery to a Stocking

Yes, I know it’s November and yes, I know we still have Thanksgiving to celebrate, but darn it anyway. It’s 2020 and I can hang my stocking if I want to. I don’t know about you, but I am so stinking excited that the Christmas season is right around the corner. I wanted to kickstart the season by embellishing this really cute stocking that I picked up in the Target Bullseye.

I used my Ricoma EM1010 embroidery machine and Chroma Embroidery Software to add my name. I love the vertical direction as opposed to the traditional horizontal direction.

In case you are interested in a multi-needle embroidery machine, Ricoma is currently offering their BLACK November sale. You can get 0% financing, free shipping and special pricing with their current sale. If you are interested and use my link you will also save an additional $100.

Here is the step by step tutorial to create this easy stocking.

Pocket Placemat

joann placemat-9-2

Well hello there!  I am happy you are here!  Over in my Craft Crazy Facebook Group. I had a group member ask if I would create a tutorial on this super cute pocket placemat!  She found this wonderful tutorial over on the Joann Fabric website and wanted to see a video tutorial.

joann placemat-1-2

I mean what is not to love about this cutie?  It’s so fun and I can think of a ton of ways to change it up, like this one:

69553325_10157469364091870_7904213054257102848_n-2

A quick change of fabrics and embellishments and you’ve got a Halloween Placemat.

Joann Fabrics did an amazing job of writing out the tutorial, but if you’d like to see a video, step by step tutorial click below:

Clear Vinyl Project Bag

clear project bag-1-2

Well hello there!  If you’ve been following along with my Clear Vinyl Bag Series, you’re about to see the newest in the lineup!  The Clear Vinyl Project Bag!

clear-project-bag-3.jpg

These are the perfect size for on the go projects.  I love that you can easily see what is inside.  I think they are pretty cute, too!

drawstring pvc-3

Check out this one!  I used the purple vinyl for Evie’s Minnie Mouse Bag.  I can see her Teddy Bear peaking out!

I have got all of the details and step by step instructions over on my youtube channel.  You can find out more here:
 

How to make a Jumbo Tote Bag

Jumbo Tote Bag-1
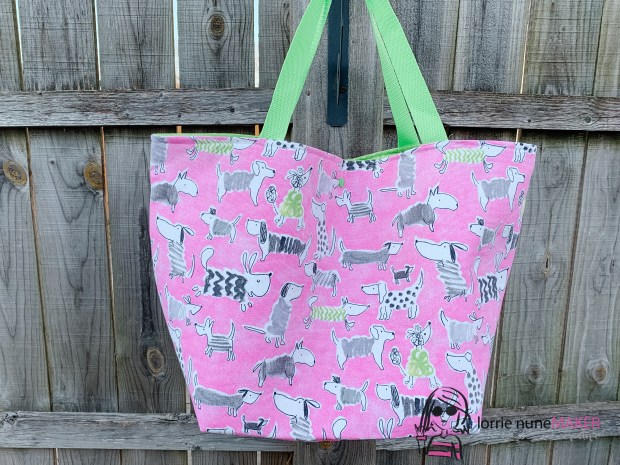
Hello and thanks for stopping by!  Today, I am excited to bring you this super handy “How to Make a Jumbo Tote Bag “tutorial.

Jumbo Tote Bag-4

My daughter asked me to make something for the grandkids that they could take their “stuff” to day care in.  It needed to be large enough to hold their nap blanket and pillow, an extra set of cloths and all of the other essentials, but it also needed to be soft a flexible enough they could fold it up and store it in their cube at daycare.

Jumbo Tote Bag-8

I came up with this pattern.  I used outdoor fabric for durability and fusible fleece to give them a bit of structure, but still soft and foldable.

I am in love with how they turned out.

By simply adjusting the size of the fabrics, you can make a tote for almost any occasion using this design.  It’s the perfect beginner sewing friendly project.

Ready to make one?  Here’s your step by step tutorial:

NEW – Cricut Bowl Koozies!

Hello there!  It’s been awhile.  I hope you enjoyed the holidays with friends and family.  I sure did!  We have been non-stop since Thanksgiving.  I took a little break in December so that I could enjoy some family time.

Today, however, I had to get back to Cricuting.  I have two new, fun patterns for you to try!

The Scallop and Round Bowl Koozie / Cozy (which do you say?)

rounded-koozie-1

They are made very much like my original bowl koozie, but the one on the left has a round edge and the one on the right has a scallop edge.

Here is a step by step tutorial for you and don’t forget to grab the free Design Space Files here:  SCALLOP KOOZIE and ROUND KOOZIE.  If you don’t have a Cricut Maker, but you have an Explore, go ahead and cut out the patterns in cardstock and then just use that at a pattern to hand cut the fabric.


Rosette Christmas Tree with the Cricut (Maker or Explore)

Rosette Tree-1-4

Oh, Christmas Tree!  Why do you have to be so stinkin’ cute?  Ha!  I just love making these table top Christmas Trees from cardstock with the Cricut!  You can make this with the Cricut Explore or Cricut MakerAll you need is the Cricut Design Space File which you can get here.

Rosette Tree-1-2

If you don’t have a Cricut yet… (you seriously need one), but you can create this by hand cutting the following rectangles and scoring each every 1/2″ down the length of each rectangle, then follow the tutorial.

You’ll need 2 strips each:

Rosette Tree-1-4


11.5 x 3″

11.5 x 2.75″

11.5 x 2.5″

11.5 x 2.25″

11.5 x 2″

11.5 x 1.75″

11.5 x 1.5″

11.5 x 1.25″

11.5 x 1″

11.5 x .75″

11.5 x .5″


OK, let’s do this!  Here’s a step by step tutorial:

Who needs a Dog Mitt… I mean Oven Mitt :)

Christmas-oven-mitt-2

I mean, c’mon!  We all have THAT friend who is dog crazy!  You know, the one who hangs signs in their house about how their dog lives here, not you.  The ones who dress their dogs, kiss their dogs on the lips, let their dog have a lick of their ice cream… you know who I’m talking about.

Christmas oven mitt-1

We love them anyway!  (Just a little side note.. I might BE THAT FRIEND).  Well, now you have a mission for your dog lovin’ crazy friend.  Make them a matching oven mitt, hot pad out of this cute Fabric Editions Fabric from Walmart.. and it’s only $0.97!  All you need is two fat quarters for the oven mitt and you can use the left overs to create this reversible matching hot pad.

Christmas oven mitt-2

How fun!

Christmas oven mitt-3

The fur… I die!  You know you want to make this just so you can have a fur cuffed oven mitt on Christmas morning.  Want to know how to make the oven mitt?  It was one of my first maker sewing projects.  I’ve got a tutorial and a FREE pattern ready for you.  Don’t have a maker, cut out the pattern in cardstock and then use that for your pattern!  I didn’t use the fur in this video, but you can either glue it on, or sew it on.  I found the strip of fur at Joanns in the craft aisle (over by the bag making supplies, feathers, etc).