I am back with another Father’s Day Gift project for you! I don’t know about your special guy, but mine loves to grill and new tools are a staple every summer.
Get him all set up with a new Apron, Towel and personalized tools. I loaded it all on a grill pan for a perfect presentation.
I created the design in Cricut Design Space (You can grab a copy here). You can personalize it any way you like. Add a name in place of Dad, change it to Grandpa, or even MOM… Moms grill, too!
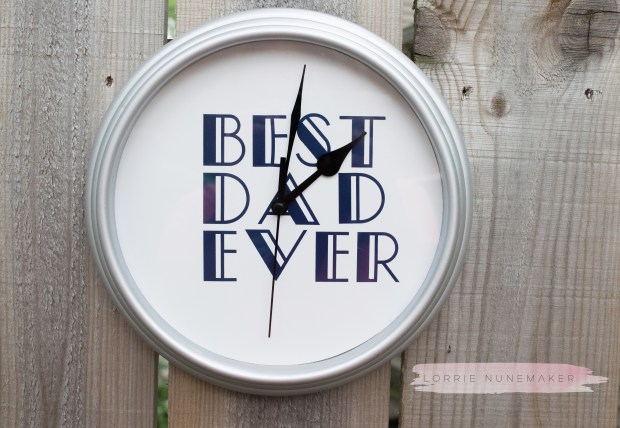
Father’s Day is just around the corner! I can’t believe it’s almost June 17th, already! Haven’t gotten dad the perfect gift yet? Don’t worry, I’ve got you covered.
This little gem is a DIY, custom made for your special guy by you! All you need is a $3.97 clock from Walmart (they come in White, Black, Red, Silver and Gold), Cricut Premium Vinyl, a piece of cardstock, and your Cricut Maker or Cricut Explore.
You can see in the top photo I added a little extra touch with the red stripes. I think they go a long way to adding just that something to make it pop. You could add a personalized name, add stars for the numbers, add a logo for your business, you name it… the sky is the limit! How about a personalized clock for the kids room?
You know I have a step by step tutorial for you! You can grab my Design Space file here or start from stratch and make your own! Don’t forget to add the hole in the middle if you start from scratch, my file already has it in there for you. Use Code LORRIE and save 10% and get free shipping on any accessories/cutting materials (Including this Premium Vinyl)! Below is the video and a list of materials used.
That, my friends, is Miss Evie! My darling, sweet grand daughter. She will be two in August and I just haven’t stayed on top of her scrapbooks.
I’m not sure why. I really enjoy the peaceful process of scrapbooking. I started my papercraft journey by scrapbooking.
A good friend, Jodie, sent me a scrapbooked birthday card many years ago, and I thought it was the most coolest thing, ever! I started scraping that same week.
Paper crafting has always been my “go to” fun place. I love the texture and layers and papers. Heck, I even love the different adhesives, cutters, scissors and ephemera. I am an office supply junkie.
Do you ever circle back to a craft that you used do to and wonder why it’s been so long since you’ve endulged? Leave me a comment and let me know what crafts you would love to get back into. I hope this is the first of many more layouts to come.
P.S. I used my Cricut Maker to cut all of the background pieces.
What is it about everything baby that is just…instantly cute! I had a big response to the baby bib gift set I posted earlier, so I decided to create a tutorial.
This project is PERFECT for a beginner sewist. The bib can easily be made with 2 fat quarters (for a reversible look), or just one if you don’t mind both sides matching. I prefer to use a flannel or terry cloth fabric for the back just to give it that soft feel and add some extra absorbency. I used a Cricut Quilting Kit for the fabric. I just love how all of their Riley Blake patterned fabrics go so well together.
If you haven’t upgraded to the Cricut Maker yet yet, don’t worry. You can make this with the Cricut Explore (or even a Silhouette). Simply follow along and cut the pattern pieces in cardstock, then use the cardstock as a pattern piece to cut your fabric by hand. Easy Peasy! Of course, I love using the Cricut Maker to cut all of my fabric pieces.
I’ve provided you with the free SVG file to use for your pattern. You can download it here. Be sure and turn off the word layers when you cut the file.
The bib is already sized for you, simply upload it into Cricut Design Space (or Silhouette Studio) and you’re ready to go.
Here’s a picture of another gift set I made using this pattern.
All of the products used in the tutorial are linked below:
Save 10% and get free shipping on Cricut Accessories with code LORRIE.Access Discounts also apply.
Disclaimer: Links above are affiliate links. By clicking on these links I may make a small commision at no cost to you. Some products may have been provided to me by vendors, however, all opinions and reviews are strictly my own.
I’m a girl… I think we are born with a “I love a good sparkle” gene. It’s simply a part of who we are. Well, that’s my story and I’m sticking to it.
… and then there’s Evie
Evie has earned the name “Drama Queen” from her mommy. Now, as Grandma (or Lolly, as they all me, I have to defend my sweet little angel grand-daughter. Maybe, she really is a drama queen, but she’s cute!
I created this file folder flip book (think mini scrapbook) from a plain ‘ole manilla file folder. Of course I had to add a pretty pink flamingo because flamingos make everything better, right!
A black and white stripe belly band adds a splash of unexpected contrast and holds everything in place.
There is so much real estate inside this little gem
Open it up up and voila – more flips and flaps and fun little places to tuck ephemera, photos and journaling.
I love layers and layers of color, texture and “happy”
Another Flip and you’ll find a fun place to tuck a personal letter, photo or handwritten journaling.
One more turn and flip and there you have it. A “FLIP BOOK”. Try one! They are a great way to use up all of that pretty stuff you’ve been hoarding! :0)
Want a closer look? Check out this video walkthrough:
 I am back with another Father’s Day Gift project for you! I don’t know about your special guy, but mine loves to grill and new tools are a staple every summer.


 … and then there’s Evie


