How to Make A Luggage Tag

Luggage tag-2

May is full of travel plans for me.  I’ve been working on this vinyl project series, so let’s make vinyl/faux leather luggage tags!  How cute are these?!!?

Luggage tag-4

I have found so many fun materials to use, like this Cricut Faux Leather, or this

Luggage tag-5

yummy pink glitter faux leather.  I mean does it really even get any better than pink glitter?

Luggage tag-6

This one was made with my friend, Teri, in my mind.  Leopard is her family tartan.  She swears it’s true! 😉 . I found this print in the ribbon section at Hobby Lobby.

Luggage tag-7

This one is probaby my favorite! It’s so stinking cute!  It’s more shiny and bright than the others.

Luggage tag-9

Did I mention you can totally use Cricut Iron On with the Cricut EasyPress to personalize?  Maggie is going to love this one!

Want to know the best news?  I’ve got a downloadable PDF pattern for you.  If you have a Cricut, I’ve even got the cut file for you.

PDF PATTERN (CLICK HERE)                               CRICUT DESIGN SPACE FILE (CLICK HERE)

iI you create one or two or five, please be sure and tag me on social media!  I would LOVE to see them!

This is probably one of the fastest, easiest tutorials I have made.  You can watch it all in the step by step video tutorial here:


*Disclaimer:  Links above are affiliate links.  By clicking on these links I may earn a small commission at no cost to you.  Some products may have been provided to me by vendors, however, all opinions and reviews are strictly my own.  This is not a sponsored post.

Personalized Gift Box with the Cricut EasyPress

woodenbox-3

Hi there and welcome back.  Today, I am sharing how I made this personalized wooden gift box.

woodenbox-7

You may recall last week, I made this personalized flask and matching etched shot glasses for my son to use to ask his friends to stand up with him in his wedding.  We wanted to present them in a wooden box.

woodenbox-4

I decided to use Cricut Vinyl Iron On rather than adhesive vinyl.  Adhesive vinyl can be hard to adhere to wood because it doesn’t want to grip easily.  Iron on is the perfect solution.  The small 6 x 7 Cricut EasyPress made it even easier.

woodenbox-2

We are really pleased with how this whole gift set turned out.  Watch the step by step tutorial to find out what settings I used on the Cricut EasyPress and a few tips when applying iron on to wood.

Decorative Towel Hanger with the Cricut

Towel Hanger-5

Thanks for stopping by.  Today I am showing you how to create a decorative towel hanger with your Cricut Maker!  Don’t have a Cricut Maker – don’t worry, I’ve got instructions for you, too.

I remember growing up that my mother and grandmother often had towels hanging from the front of the stove.  They were attached with some of grandmother’s handy dandy killer crochet skills.  Towel Hanger-8 Apparently, a skill that I did not inherit!  🙂 .

I wanted to create a towel hanger to keep a certain someone (sorry, Doug) from grabbing my pretty decorative towels and wiping up spilled milk on the counter.  Just sayin… PAPER TOWELS!   I digress.

I decided to create a pattern in Cricut Design Space (you can grab it here) and create my very own modern version of Grandmother’s Crochet’d towel holder.

Towel Hanger-7

I think this is the perfect gift for most every home.  It would be great fun to make one for each season/holiday and gift them as a set.

I used the Cricut EasyPress to create this Rae Dunn Inspired Flannel towel holder.  The Easypress  also helped me create holiday towels for Christmas like this oneTowel Hanger-4

and this one.  Excuse Wrigley… he thinks hes a prop.

Towel Hanger-1

I just love the fact that you can get two towel holders from 1 towel.

Towel Hanger-11
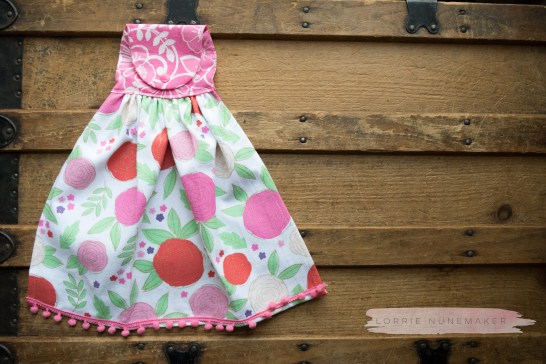
I added a little pom pom trim to this one!  A girl has to have pom poms in her life, right?

I bet you can guess that I have a step by step tutorial for you and you can help yourself to the pattern above.

Do you need a PDF version?  I’ve got you taken care of too!  You can get the PDF version here.

Here’s the video tutorial:

Social Media Info

Facebook:  https://www.facebook.com/lorrienunemaker/

My blog:    http://www.lorrieNunemakercom/

Pinterest: https://www.pinterest.com/lanunemaker/

Instagram:  https://www.instagram.com/lorrie_nunemaker/

Youtube:  https://www.youtube.com/user/LONU2008

*Disclaimer:  Links above are affiliate links.  By clicking on these links I may earn a small commission at no cost to you.  Some products may have been provided to me by vendors, however, all opinions and reviews are strictly my own.

DIY Christmas Ornaments with the Cricut (Explore & Maker Friendly Project)

hoop ornament-23

I can’t believe I’m already thinking about the Holidays! Where has this year gone?  I want to get things ready a little ahead of time so I can sit back, sip eggnog and enjoy the kiddos this holiday season, so I went ahead and created this year’s personalized ornaments!

hoop ornament-21

I am still working on those flannel scraps and decided to put them to use with an embroidery hoop!

hoop ornament-19

To step it up a notch, I decided to create some wonky stitching around the edges, but this step is totally optional.

hoop ornament-34

I think the stitching adds a little character and the handmade look, which I love.

hoop ornament-32

I used a little HeatNBond, applied with the Cricut EasyPress to apply the canvas letters.  You can see I reversed it on the letter D and used the flannel for the letter and the canvas for the background.

hoop ornament-6

It’s a really easy way to create personalized ornaments for co-workers, family and friends!

Simply add an elastic string to the hoop closure and a little hot glued bow and voila… you’re all done!  On to the next project.

Here’s a quick video! (Products used linked below the video)

Embroidery Hoops: https://amzn.to/2zX1cNT
HeatnBond Lite: https://amzn.to/2pFn1eQ
ricut Easy Press: http://shrsl.com/jljn
Cricut Easy Press Bunhttp://shrsl.com/lllkdles: Cricut Easy Press + Iron On Bundle Starter Kit:
Cricut Easy Press + Iron On Variety Kit: http://shrsl.com/lllr
Cricut Easy Press + Bulk Iron On Kit: http://shrsl.com/lllt

Chricut Easy Press Mat: http://shrsl.com/zz3w
Flannel from Joanns

Use Code LORRIE to receive 10% off and Free Shipping on all supplies at Cricut’s website (Does not apply to machines)

Affiliate links used above. Thank you 🙂

Cricut Easy Press Facebook Group: https://www.facebook.com/groups/CricutEasyPress/

Cricut Education & Inspiration Facebook Group: https://www.facebook.com/groups/CricutEducationandInspiration/
*****
Social Media Info

Facebook: https://www.facebook.com/lorrienunemaker/

My blog: http://www.lorrieNunemakercom/

Pinterest: https://www.pinterest.com/lanunemaker/

Instagram: https://www.instagram.com/lorrie_nunemaker/

Youtube: https://www.youtube.com/user/LONU2008

*Disclaimer:  Links above are affiliate links.  By clicking on these links I may earn a small commission at no cost to you.  Some products may have been provided to me by vendors, however, all opinions and reviews are strictly my own.
Jingle Bells by Kevin MacLeod is licensed under a Creative Commons Attribution license (https://creativecommons.org/licenses/by/4.0/)
Source: http://incompetech.com/music/royalty-free/index.html?isrc=USUAN1100187
Artist: http://incompetech.com/

How to Iron On HTV on Wood with the Cricut EasyPress 2

Hello!  Happy Saturday!  Speaking of Saturday… next weekend I am headed to a wedding reception for a married young couple.  I wanted to give them a little bit of handmade fun to help celebrate the occassion.  I came up with this wood themed set.

IMG_9999 2

I used the Cricut EasyPress 2 to add all of the personalization!  It looks like its engraved or wood burned, but it’s not!

IMG_0002

I thought about the fact that soon they would be celebrating their “First Christmas as Mr. and Mrs” and thought they needed a keepsake…. and besides, it matches!  WOOD PRESS-1-4

The EasyPress 2 makes it so easy to customize all of your handmade goodies (and we won’t tell if you personalize store bought items, too! ) 🙂

WOOD PRESS-1-3

These gifts are “made with love” and I can’t wait to share them with the Bride and Groom.

You know, I had to make a tutorial to go along with this!  I think this is a really fun and really inexpensive gift idea and with the holidays around the corner, you just might want to grab some wood slices and create your own!

Here’s the video tutorial!

How to Iron on a Canvas – Cricut EasyPress 2

The new Cricut EasyPress 2 (available for purchase this Fall) was released at the Cricut Makeathon a couple of weeks ago!  We were all so excited about the new features!  Besides the new color (how about that amazing flamingo pink/orange), the new EasyPress 2 heats up to 400 degrees, heats up faster (than the prevous model), has a new improved base plate and now has a USB port for future firmware updates.  Already have the Original model?  No worries!  it still does everything it did before and is still an amazing machine (available on Amazon for $109), however, the new EasyPress 2 now comes in 3 sizes: 6 x 7 (great for onsies and hats), the original 9 x 9 and the big daddy of the bunch 10 x 12 (great for adult tshirting.  Yes, Tshirting is a word, a verb rather… the act of making tshirts.

Screen Shot 2018-08-18 at 3.59.04 PM

OK… so what is today’s project?  Why it’s a super, duper Canvas Wall Decor “Never Stop Making” design.

1122

Sort of fun, right?  I record the how to video live on my Facebook Page (yes, live is not my thing.. and I meant to do this in my Cricut EasyPress Group, but instead did it on my personal page… Ugh….), but I saved it, edited out some of the chatty stuff and uploaded it to my youtube. Here you go!


note:   Some links above may be affiliate links, but opinions are strictly my own.


Checkers with the Cricut

Checkers-6

I don’t know about you, but I love a quick game of checkers! It’s even more fun when you can make your own checkerboard in any cute fabric and color scheme.  This turned out to be a Chicago Bears color scheme (totally unintensionally), but how fun would it be to make one in your school colors for a graduation party, make a patriotic one for July 4th outdoor party or even use some pretty summer fabrics to create a checker set for your deck.

Checkers-1

This project comes together so quickly and takes very little sewing experience.  I bet you could get away with hot glue if you wanted to… just sayin!

Checkers-4

I added this tic tac toe drawstring bag to house all of the checker pieces and it doubles as an alternative game.  You could also add the tic tac toe game to the backside of the checkerboard… lots of alternatives with this one!

Checkers-14

When you are all done and ready to put it away.. it rolls up into a nice little size that you can easily store until the next game time.

Checkers-5

So.. have I convinved you that you need a personalized DIY checkerboard in your life?  Well you’re in luck because I’ve got a step by step tutorial for you and you can grab the Cricut Design Space Pattern for the checkerboard here.  You can find a product list below the video.

Use code LORRIE and save 10% and get free shipping on Cricut Accessories (Machines not included)
Cricut Self Healing Cutting Mat
Cricut Acrylic Ruler
Cricut Rotary Cutter
Cricut True Control Knife Blade
Cricut Fusible Fabric 
Cricut Metal Ruler
Cricut Easy Press
Cricut Everyday Iron On
Cricut Maker
Cricut Explore Air 2
Cricut Mats
1/2″ Flat Washers: https://amzn.to/2zt0av1
HeatnBond Craft Extra Firm Interfacing

Cricut Easy Press Group:

*****
Social Media Info

Facebook: https://www.facebook.com/lanunemaker

My blog: http://www.lorrieNunemakercom/

Pinterest: https://www.pinterest.com/lanunemaker/

Instagram: https://www.instagram.com/lorrie_nunemaker/

Youtube: https://www.youtube.com/user/LONU2008

*Disclaimer:  Links above are affiliate links.  By clicking on these links I may earn a small commission at no cost to you.  Some products may have been provided to me by vendors, however, all opinions and reviews are strictly my own.

Cricut EasyPress Insulated Lunch Tote

Fruit Tote-1Well hello there!  I am back with a QUICK, EASY summer project using your Cricut EasyPress and an insulated lunch tote from the Target Dollar Spot.  I picked up this really cute, striped lunch bag and floral can kooze in the Target Dollar Spot earlier today.  They had a few difference styles, but these were “my colors”…. and so.. they jumped in my cart…(darn you, Target Dollar Spot!)

As soon as I got home, I knew I needed to find a super cute summer saying to add a little Cricut iron on to make it uniquely mine.  LoveSVG had just what I needed and it was FREE.  You can find the design I used here.

Applying iron on to a coated polyester (feels like plastic) material can be a bit tricky, butuntitled-1

a few easy to follow steps and you’ll be off making your own personalized lunch totes in no time!  Products used are listed at the bottom of this post.

Wouldn’t this be a fun teacher’s gift or great to throw in the tote for an afternoon trip to the park with the kiddos?

Fruit Tote-1

I’ve

Here is a list of the items I used to create this gift set.

Cricut  Easy Press:  http://shrsl.com/jljn

Cricut Easy Press Bunhttp://shrsl.com/lllkdles:  Cricut Easy Press + Iron On Bundle Starter Kit:

Cricut Easy Press + Iron On Variety Kit:  http://shrsl.com/lllr

Cricut Easy Press + Bulk Iron On Kit:  http://shrsl.com/lllt

Cricut Easy Press Mat:  http://shrsl.com/zz3w

Cricut Iron On:  http://shrsl.com/iyu5

Teflon Sheet: http://shrsl.com/lsvc

Other Options:

Steady Betty Ironing Pressing Surface:http://amzn.to/2yUOpcL

Pressing Pad:  http://amzn.to/2idc6VL

Cricut Maker: http://shrsl.com/jljo

Cricut Explore Air 2:  Cricut Explore Air 2:  http://shrsl.com/ka3p

Use Code LORRIE to receive 10% off and Free Shipping on all supplies at Cricut’s website (Does not apply to machines)

Affiliate links used above.  Thank you 🙂

Beach Towel Tote Bag!

Beach bag-1

Hello there!  It’s finally starting to look like Summer here in Indiana and that means beach time and lots of running around.  I can always use an XL tote to keep me organized from one place to the next.  I created this fun bag from a beach towel!

Beach bag-1-5

You can’t even believe how easy it is!  I made this in under 30 minutes and you can too!  This is the perfect beginner sewing project.  ( How cute is this “Tropic like it’s Hot” SVG from LoveSVG?)

Beach bag-3

The best part is, it’s so easy to throw in the laundry with your other towels, it’s easy to personalize (make one for each of the kiddos with their own name), it’s is so big you can use it for the beach, a diaper bag, sleepovers, you name it – I’m pretty sure it’s going to fit!  If you want it a little smaller, it’s really easy to downsize, simply cut your pieces smaller.

Beach bag-1-4

I personalized my bag with the Cricut EasyPress.  I used the cotton settings and made sure to press from both the inside and outside of the bag.  I used Glitter Iron On and Regular Cricut Lite Iron On.  (Hint:  use code LORRIE and save 10% and get free shipping on Iron On and other Cricut Accessories).   I used pretty towels from Walmart, but any beach towel would work.  Are you ready for the step by step tutorial?