DIY Fabric Labels

Fabric labels-5-2

I am pretty sure that more often than not, when I upload a sewing project, I get asked more questions about my personalized labels than I do about the project.  I have a lot of fabric labels.  A friend gifted me some really fun satin labels for my birthday, last year.  I love them so much.  However, there are time when I need a different color, shape or size.

Fabric labels-6

Time like those, are when I turn to my Cricut Easy Press, Online Labels Heat Transfer Paper and Thermoweb Heat N Bond Fusible Interfacing.  It is so easy to whip up a ton of labels in a variety of sizes and colors in no time flat.

Fabric labels-7

I keep a page or two ready to go and saved the file on my computer, so when I need more, I just print another page.
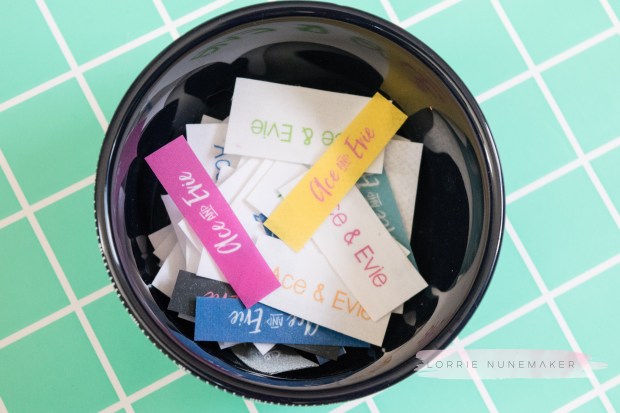
Fabric labels-8

I have this bowl full of different shapes and sizes and it makes me happy.  I really believe they take your handmade gifts and make them even more special.

Are you ready to make your very own personalized labels?  Here’s the video tutorial:

Products used:

OnlineLabels iron-on transfer paper for light fabric:  https://www.onlinelabels.com/Products/OL362HL.htm

HeatnBond Fusible Interfacing – LITE:  http://shrsl.com/vjug

Cricut  Easy Press:  http://shrsl.com/jljn

Cricut Easy Press Bundles:  Cricut Easy Press + Iron On Bundle Starter Kit:  http://shrsl.com/lllk

Cricut Easy Press + Iron On Variety Kit:  http://shrsl.com/lllr

Cricut Easy Press + Bulk Iron On Kit:  http://shrsl.com/lllt

Cricut Easy Press Mat:   http://shrsl.com/uajt

Use code LORRIE and save 10% and get Free shipping on the

Cricut Rotary Cutter:  http://shrsl.com/vjul

Cricut Cutting Mat:  Available at Michaels

Disclaimer:  Links above are affiliate links.  By clicking on these links I may make some change at no cost to you.  Some products may have been provided to me by vendors, however, all opinions and reviews are strictly my own.

Baby Burp Cloths

Hey there everyone!  It’s me…again… twice in one day!

I have the day off and I didn’t get to post last week, so I am bringing you a bonus project today.

Burp-3

I needed a super easy, super quick baby gift this past weekend.  I made a set of 3 burb cloths in about 20 minutes.  I can’t even get to the store to buy something that quickly.

Burp-1

I think they turned out so cute and what new mom doesn’t need some practical gifts to go along with all of those darling baby outfits.

Burp-5

A little ribbon and you’ve got yourself a really cute baby gift.  You probably already have scraps of fabric or fat quarters just waiting to be made into cute baby gifts!

Burp Cloths (2 of 5)

Here’s another set.  I made these with fat quarters from Walmart.  Don’t they look cute together?!!

A little tip:  When sewing with terry cloth, use a longer stitch length (I used a 3.0 to sew it together and a 3.5 to topstitch).

I made you a quick tutorial, but these are so easy, you probably don’t even need it.  ).

Create a Pattern & Card Wallet with the Cricut Maker & HeatnBond

I am having so much fun with my Cricut Maker!  Everyday, it seems, I dream of things to make and patterns to create.

Card Wallet-4

Last night, I got home from work and immediately started working on designing a pattern for these cuties that the Cricut Maker could cut out for me.  It was super easy, and the fact that the Cricut Maker not only cut out my fabric and interfacing, but also drew my seam allowances, made making these super easy – even for a beginner sewist, like me!

Card Wallet-10

These are the perfect size for business cards or credit cards.  I love using small wallets like this for a quick run to the grocery or after school sport events.

Card Wallet-15

I added a keyring so that you could easily clip your car keys or even a lobster clasp could be added to clip it to a backpack or purse.

I used Heat N Bond Fusible Extra Firm interfacing to create the perfect firmness to these little gems.

The fun fabrics are from a Pioneer Woman Placemat (top left $3.47 from Walmart), Fabric Editions (top right and lower left – $0.97 from Walmart) and some fabric from my scraps bin from Riley Blake (lower right).

Wanna make one?  Guess what?  I’ve got a tutorial for you!

Decorative Ruffle Towel with Cricut and Heat n Bond

Welcome!  I’m so glad you’re here and I’m super excited about today’s project!

Today, we are mixing up some of my favorite things!  First off we are using this GORGEOUS fabric by Riley Blake!  It’s part of a quilt kit available from Cricut.

 Aren’t they dreamy!  I LOVE THEM!

Next up we are using my oh, so favorite Cricut Maker, and finally Thermoweb Heat N Bond.

This is a really easy project.   All you need is a towel, fabric, HeatnBond Lite, your Cricut Maker and a sewing machine.  Don’t worry, I’ve got step-by-step instructions for you in the video tutorial below.

Are you ready to make one?  Simply change the fabrics and applique and I think these will be perfect decorations and gifts all year around!

Here’s the tutorial for you!


Fabric Baskets from a Placemat – Easiest Project EVER!

Hello again!  I seem to have a thing for placemats recently.  Today, I am showing you my latest creation and it is Simply THE EASIEST PROJECT EVER!

Placemat basket-17ΩTadaa!!!!  I mean… how cute is that and I literally two of them in less than 10 minutes!  I’m not exaggerating!

Placemat basket-1The best part?  Is this is a perfect project for beginner sewist (like me) and, even those who are masters.  Who doesn’t need an extra Catchall in the kids room, the bathroom or almost anywhere?

Placemat basket-9I have 5 balls of yard, plus some pom poms in this one.

Placemat basket-14I think the pom poms look so cute folded down like this, but you can leave them up and it’s super cute like that as well and gives you even more room.  I made a few others (you can see them in the video).  Endless possiblities.

Placemat basket-3

Oh, did I mention… this was made from a $3.47 Pioneer Woman Placemat at Walmart!  Yep… it’s that easy!

Ready to make one?  Here’s your tutorial!  Have fun and don’t forget to tag me on social media so I can see yours!!

PJs with the Cricut Maker & Heat N Bond

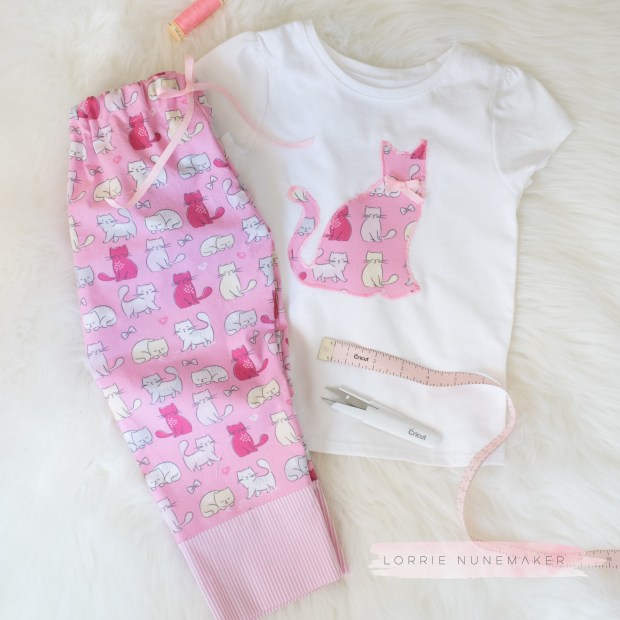
CAT PJ!!!

It’s Sunday Funday!  I’m having all the feels for this oh so cute set of PJ’s I made for my cat loving granddaughter, Evie.

cat-pj5

It is so easy to whip these up for any theme.  The Cricut Maker cut the fabric which I had fused with Heat N Bond Lite.  I just fused it onto a t-shirt with my Cricut Easy Press and  then stitched around the edges .

Cat PJs-3I used the same fabric to make some matching pj pants and ba-da-bing ba-da-boom… the Cat’s Meow PJs are finished!  The fabric (in case you have a kitty loving granddaughter in your family) is from Joann Fabrics.

Want to make some?  I’ve got another tutorial for you!

Drawstring Bag with Cricut and Heat N Bond

Bunny Bag-4-3

Can you believe Easter is almost here?  Wow, the time is flying by!  I decided I needed a few Easter Gift bags and because I love sewing with my Cricut Maker cutting all of the fabric

bunny bag-1-3

I made my own drawstring bags.  I posted the one above a few days ago.  I had an enormous amount of requests for a tutorial, so… I made another one.

Bunny Bag-5

This time I wanted to use some non-traditional colors for Easter, so red and blue it is!

Bunny Bag-3-3

I also change the bunny bum from a handmade pom pom to this cute little furry bum!  I used Cricut felt and Thermoweb Heat n Bond to attach the bunny.  He’s so cute in red, don’t you think?

Bunny Bag-5

This pattern/design is perfect for all kinds of projects and occasions!

Don’t worry if you don’t have the Cricut Maker,  you can still follow the tutorial and cut it out by hand.  It’s super simple to cut the six rectangles it takes to assemble the bag.

Here’s a step by step tutorial for you.  Oh, and here’s the SVG for bunny (in case you want to make your bag Easter themed).

What DIY projects are you making for Easter?

Bunny Bag with the Cricut Maker and Heat N Bond

I had so much fun sewing this cute little bunny bag.  I needed something easy and fun to put a ittle Easter Gift for Evie in.  I made this fully lined draw string bag out of two fat quarters of fabric.  I used my Cricut Maker to cut the felt bunny which I had lined with Heat n Bond Ultra.  Then I used the Cricut Easy Press to apply the bunny to the bag.

I added a little hot glue to the Pom Pom I made with this pom pom maker and added it to her little bum.

Sometimes the wrapping is as fun as the gift!  I hope to have a tutorial on this soon.

I have made the video tutorial since this post. You can watch it here: https://youtu.be/XclukN8Y85Y

What are some of your favorite ways to wrap gifts?

Disclaimer:  Links above are affiliate links.  By clicking on these links I may make some change at no cost to you.  Some products may have been provided to me by vendors, however, all opinions and reviews are strictly my own.

Planner / Journal Pen Holder with Cricut Maker

Today, I have a really fun and super easy project for you!

Pretty fun, right?!!  These are super easy to put together and great for beginner sewists, like me!

The best part is, you can customize them to fit any planner and/or color preference.

You can see on this one I wanted to add a little color to my Heidi Swapp Gold Polka Dot planner, so I added Coral and Teal.  Dreamy!

I just love it!

How about this combo?  Florals are kinda my go to theme!

 Which is your favorite?

I would love to see what combinations you make!  I made a video for you, you knew I would!  I think these would be really fun to personalize with the Cricut Easy Press!

If you’re a Cricut Maker User, you can grab the Design Spacefile here and cut it out with your Maker.  Don’t have a Cricut Maker, no worries.  You can cut this pattern by hand!  It’s super easy.

Thanks for stopping by!  Leave me a comment and let me know what colors you’re making!

Please note affiliate links may be used above. Clicking these links help support this channel at no cost to you.

Card Wallet from a Placemat

We are making card wallets today and the best part about it is –   We are making them from a placemat!  These are oh so easy and the perfect project for the beginner sewists, like me!

I recently went to Creativation in Phoenix and needed something to carry my business cards to the show.  I bought a boring little magnetic metal pouch to take to the show, but I was thinking this morning that there must be a cuter alternative.

Which led me to my craftroom and my Pioneer Woman placemats.  I whipped up a couple of these in less than 30 minutes.  The only supplies you need are a placemat, ruler, magnetic closure, a piece of coordinating fabric and your sewing machine.

Ready to make one?  You guessed it!  I’ve got a video tutorial for you.  Please tag me on social media if you make one!

Please note affiliate links may be used above. Clicking these links help support this channel at no cost to you.