How to create a personalized mirrored compact with the SG500 Sublimation Printer

I am continually amazed by the fun array of sublimation blanks that are available. Today, we are sublimating a mirrored compact. This is such a fun little keepsake.

It’s the perfect size for a travel kit or keep in your purse. The fun part is that the top insert can be sublimated with your favorite quote, photo or just about anything you want. Wouldn’t it be fun to add a wedding photo, a photo of grandma and/or grandpa or your favorite great nephew (like I did).

The Sawgrass SG500 sublimation printer makes it so easy to create really unique and personalized gifts in a matter of minutes. Simply print your image, heat up your heat press and apply the printed image to the sublimation insert. Voila, you have the perfect Easter Basket gift, stocking stuffer, momento and/or gift for any occasion.

This mirrored compact came from JP Plus. It was part of my monthly Trend Box. You can use code 9PSR5 and save 15% off your order of any sublimation blanks – does not apply to the Trend Box or machines.

Let’s walk through the process of creating this one-of-a-kind keepsake in today’s video tutorial below. Leave me a comment and let me know what you would like to put on your compact?

How to Subimate a Plushie

Hello Teddy Bear Cuteness! Ace and Evie are going to go nuts over these Teddy Bear Plushies. First of all, they are plushies and second of all, they have their favorite characters on them. I bet you can guess who likes each one, but I can almost guarantee they will still fuss over them.

These plushies with sublimatable T-shirts are from JP Plus. You can get them here. They also have a rabbit, dog and an elephant. I purchased two of the the bears just to keep the arguing to a minimum (I know some of you can relate). Use code 9PSR5 and get 15% off your order (be sure and add the shirts to your order – they don’t come with the plushie).

As always I used my Sawgrass SG500 Subimation Printer and my cute pink heat press. Heat presses don’t have to be an eyesore in the middle of your creative space.

I put together a quick video to show you just how easy they are to customize. Leave me a comment and let me know what you will put on your plushies. Will you get the Bunny, Dog, Elephant or Bear?

*Disclaimer:  Some links above are affiliate links.  By clicking on these links I may earn a small commission at no cost to you.   Some products may have been provided to me by vendors.  All opinions and reviews are strictly my own.

Animal Print Key Chains… I mean c’mon :)

I was so happy when Parker on the Porch gave me the OK to make a video featuring her fun animal print key chains. I mean, Leopard is the signature pattern of this crazy 2020 year.

Leopard is everywhere.

They are each made on the embroidery machine. I used my Ricoma EM1010 Multi-Needle Machine (link saves you $100), but you can make them on a single-needle machine as well.

I sent this one to my leopard-loving friend, Teri. She loved leopard before leopard was on every display at the mall.

I kept the Zebra keychain, but I love the tiger print, too! Don’t you think they would make the perfect stocking stuffer?

If you want to learn how to make these adorable In the Hoop Key Chains, click the tutorial below.

*Disclaimer:  Some links above are affiliate links.  By clicking on these links I may earn a small commission at no cost to you.   Some products may have been provided to me by vendors.  All opinions and reviews are strictly my own.

How to Sublimate a Slap Wrap for a Can/Bottle Koozie

Are you looking for stocking stuffer ideas? I’ve got a fun one for you!

This is such a fun and unusual koozie. When my children were little they had bracelets that worked the same way that slap wrap can koozies work the same way.

I think they are the perfect stocking stuffer, great for football game parties, themed parties and holidays.

This Slap Wrap was a part of the JP Plus Subscription Trend Box that ships in December. If you want to be sure and get this particular box be sure an order no later than November 15th, 2020. To see what else is in this box you can check out my video by clicking here. The Subscription box is full of fun and unusual sublimation blanks.


You can find the Sublimation Slap Wraps here. You can use coupon code 9PSR5 and save an additional 15% off your order of any blanks.

I have created a step by step tutorial so that you can create some of these fun Slap Wraps.

In the Hoop Airpod Case

This is such a fun, quick and easy project! My favorite kind of project. Can you believe this is made on an embroidery machine?

How many times have you reached for your Airpods and they either A) are not in your purse, or B) they have sunk to the deep, bottomless bottom of your bag where gumwrappers, pennies and stuff we don’t want to mention live?

Problem solved! Crashing Waves Designs came up with this awesome case that can be easily clipped inside your handbag so that you always know exactly where the Airpods are.

I love the cork version but you can easily use faux leather for this fantastic In the Hoop (ITH) embroidery project. I am making one for each of the kids for stocking stuffers this year. I think they will love them.

I’ve included a supply list below so you can make your own.

Faux Leather

Lobster Clasp

KamSnap Kit

Tear Away Stablizer

Follow my Step by Step Tutorial here:

Brinkley Double Zipper Pouch / Cross Body Bag

IMG_5800Thanks for stopping by!  I am so excited to share with you the Brinkley Double Zipper Pouch / Cross body Bag.  This is a fun and practical bag.  It features two zipper pockets

IMG_5792

as well as a surprise third pocket in the middle.  It’s super roomy.  I can easily fit my iphone XS Max inside the smaller pouch with plenty room to spare for keys, wallet, etc.

IMG_5807

I made two different sizes.  The smaller size is approximately 6 x 8 and the larger is 8×10.

IMG_5821

I love that you can easily switch between a clutch to a cross body bag by simply changing the detachable strap.

The measurements are as follows:

2 Outer Fabrics 8″ x 10″ (small size 6 x 8) .

2 Lining Fabrics 8 x 10 (small size 6 x 8)

2 Fusible Fleece cut to 7.5 x 9.5

1 Fabric for wristlet strap 3″ x 15″ (lengthen or shorten to your preference)

1 Fabric (or vinyl) 2 x 4″ for tab

1 D-ring / 1 Swivel Lobster Clasp

I will be making several of these for Christmas gifts.  Are you ready to make one (or three?).  Get your zippers, some cute fabric and your favorite beverage and let’s get making!!  Here is a step by step tutorial for you:

Triangle Pouch

Triangle Pouch-1
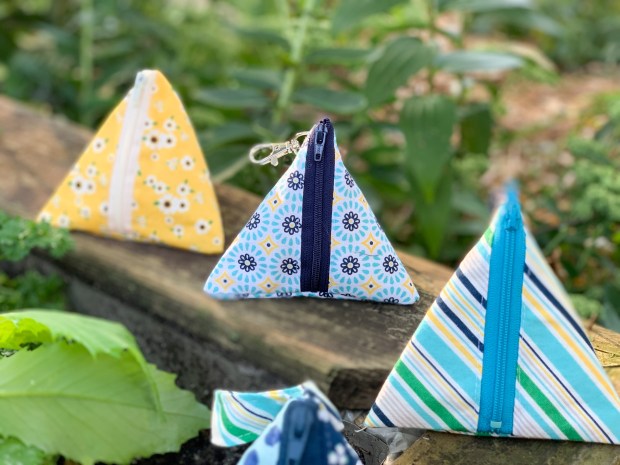
Triangle Pouches are super fun to make and they look harder than they really are.  It’s really just a few straight seams and you’re done.

Triangle Pouch-1-2

I looked around at Pinterest and Youtube and couldn’t find any tutorials showing how to fully enclose all the of the seams in the lining.  I really love the simplisity of the patterns I saw on Pinterest, but I didn’t love seeing the raw edged seams on the lining.  I wanted the inside to be as pretty as the outside.

Triangle Pouch-2

So, I created my own tutorial with a completely finished linining.  It’s really not hard at all and only adds 2 extra steps.

Triangle Pouch-3

They turned out great and I can’t wait to give a few to some friends.  They are also the perfect STOCKING STUFFER size!  You could add a chapstick, handsanitzer or something fun and stuff them into the stocking or even hang them from the stocking.  So many ideas.

Are you ready for the tutorial and to find out how I enclosed all of the seams?  Here you go!

the Evie Scrunchie – FREE Pattern Included

IMG_4773

I am back with another Scrunchie tutorial!  Who would have thought that Scrunchies would be back in style!  I am seeing them everywhere and in lots of shapes and sizes.

IMG_4780

I created the EVIE Scrunchie with my grand-daughter in mind, obviously.  I think it is adorable.  I am a sucker for all things bows.

IMG_4778

The beauty of the Scrunchies is that you can mix and match the Urban Scrunchie with the Mini Scrunchie with the Evie Scrunchie.  They all work similarly and together.  I was inspired to make this set from the headband tutorial I showed you last week using the Urban Scrunchie Mini.   I just love the rainbow of color and Evie will have an accessory for every outfit.

evie template-1

I added the solid templates to the shop. You can click HERE the to purchase or just click on SHOP at the top of the page.  As always, I also have a FREE printable PDF and SVG for you as well.  You can find that HERE.

Are you ready for the Tutorial:

Toiletry Travel Kit with Cricut

3

I am excited to say I am going on a “girls’ trip” soon!  I thought it was time to add a little cuteness factor to my travel bag.  I used Cricut Premium Vinyl and my Cricut Maker to make this fun little bag.

4

You can absolutely use the Cricut Explore to make this as well.  I started with a blank toiletry kit like this one and used my Design Space File.   This is a great beginner project for every Cricut user.

1

I will walk you through every step of the way in the detailed, step-by-step tutorial below.

4

Watch the tutorial here:

*****

Social Media Info

Facebook:  https://www.facebook.com/lorrienunemaker/

My blog:    http://www.lorrieNunemakercom/

Pinterest: https://www.pinterest.com/lanunemaker/

Instagram:  https://www.instagram.com/lorrie_nunemaker/

Youtube:  https://www.youtube.com/user/LONU2008

*Disclaimer:  Links above are affiliate links.  By clicking on these links I may earn a small commission at no cost to you.  Some products may have been provided to me by vendors, however, all opinions and reviews are strictly my own.

Round Make Up Bag with The Cricut

DSC_0002

Hello and thanks for stopping by!  Today, I have a new make up pouch tutorial for you.  We have all seen this style of make up bag, but did you know how EASY they are to make on your own?

DSC_0005

I even added a vinyl lining which makes it easy to wipe up any spills or powders that can get inside a make up pouch.  It’s not just me that is messy, right?

DSC_0011

Or leave the vinyl out, like the one above and use it for your jewelry when traveling or your child’s legos… there’s never a shortage of uses for a pouch!

DSC_0003

If you don’t have a Maker, yet, never fear because I have a work around for you.  I bet you have a dinner plate and that will work just fine, too!

DSC_0006

You can whip these up in time for Christmas gift giving!  They take very little supplies and picking the fabrics is half the fun!

Ready for the tutorial?  Grab the Design Space file HERE.