Hippity, Hoppidy Easter’s on it’s Way

I found the cutest bunny tote bags at Target. in the Bullseye “Dollar Spot” section. They were only $3 each. I grabbed a couple thinking that the would be perfect to fill with books and candy for Ave and Evie for Easter.

Of course, my first thought was personalization. I used Chroma Luxe software to digitze two simple names. I love that you can use any True Type font on your computer and Chroma will turn it into an embroidery file.

I decided to add a couple of snap tabs just to add a little fun and color. I found the snap tab files at Crashing Waves Designs. She’s got so many cute files.

While I used the Ricoma EM1010 Multi-Needle Embroidery Machine to stitch out my designs, you could also use a single needle machine. If you don’t have an embroidery machine, you could easily do something similar with iron on/heat transfer vinyl.

Here’s the step by step tutorial including digitizing in Chroma.

Parkside Tote – Collaboration with OklaRoots

parkside1

I have been so excited to release the Parkside Tote Bag.  OklaRoots and I collaborated on this super fun, super practical tote bag.

IMG_6053

We are both bag makers.  She is also a quilter – I want to be a quilter.  Neither of us have the time to commit to a full size quilt everytime we want to quilt, so we decided to combine our two loves and voila… the Parkside Tote was built.

Jess over at OklaRoots designed the quilt block just for you.  It is perfectly sized and pieced together to fit within the construction of this tote.  You can visit her blog and Youtube to find out how to make the quilt portion of the bag, pick up the PDF templates and she’s even got SVGs for all of you digital die cutting makers.

IMG_3399
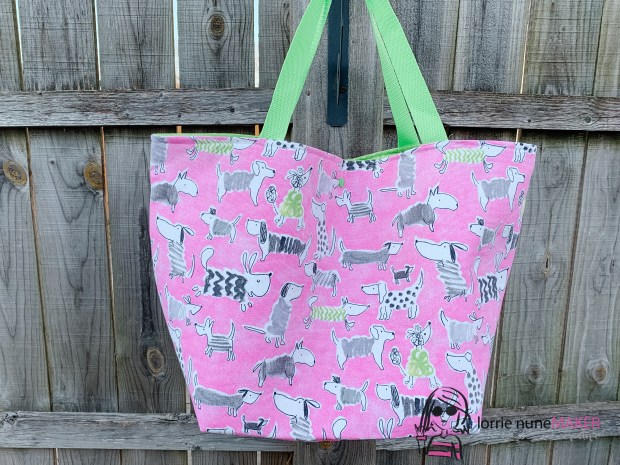
Then stop back here and I’ll show you how to construct the bag.  I’ve got a PDF for you with all of the dimensions for the fabric portions of the bag.  You can get it HERE.

parkside4

There is so much room inside of this bag.

parksdie3

I bet you can’t just make one!!!IMG_4937.jpg

So, grab some fabric, vinyl, cork or whatever your preference is, and let’s get started!

Clear Halloween Tote Bag with GLOW IN THE DARK sticks

IMG_5984 4

First of all, let say, photographing a clear bag and glow in the dark bags are not easy tasks!  However, I was so excited to get this idea posted and shared in time for you to create a few Halloween Bags for the littles before Halloween, that I decided to go with what I had.

IMG_5973

Aren’t these fun?!?!  I think Ace and Evie will get a kick out of being able to see their candy in their clear Trick Or Treat Totes, but they will be very excited about the Glow In The Dark feature.

IMG_5982 4

I had this idea the other day to create clear Halloween Tote bags.  I was talking to my friend, Teri, and she mentioned throwing a glow stick in would be a fun addition to the bag and so, the Glow In The Dark – Clear Halloween Tote was created.  I love it!!!

IMG_5974 2

As always, I’ve got a step by step tutorial for you to give you a general idea on how I constructed this bag.  You can adjust the sizes according to your Trick or Treater.


The Ashley Tote Bag

Ashley-Tote-YT

Hi there!  Over in my Craft Crazy with Lorrie nuneMAKER Facebook Group I posted a bag similar to this quite awhile ago.  It was this bag:

IMG_5139 2

and boy did I have a lot of request to make a tutorial.  Life got in the way… my son got married.  I have been so busy with wedding planning, guests every weekend, that I just didn’t have time to create a tutorial.

I did, however, take the time one afternoon to make a mock up so that I could get the dimensions down.  I came up with this tote:

IMG_5147 2.jpeg

Today, I finally had a chance to take a little bit from each bag and change it up just a little more and create the “Ashley” tote.  I love it so much.

Ashley Tote-4

The fabric makes me happy and the quilting just gives me all the feels.

Ashley Tote-6

Green and white polka dot?  I mean, c’mon!

Ashley Tote-5

Of course, I have a step by step tutorial for you.  You can find it below.  I have written down all of the dimensions for you.  You can get them in my shop HERE.

Here’s the video tutorial:   

Placemat Pouch Version 10! – The Tote

This is going to be a really quick post.  I started the Placemat Pouch Series over a year ago and the response has been overwhelming.  There are now 10 different placemat projects.

Today, I launched the newest member – Version 10 – The Tote.

Placemat 10

I am really happy with how this one turned out and I think the faux leather opens up a bunch of possiblities with the Placemat projects.  I’ve already got a few others lined up.

You can find the Step By Step Tutorial Here:

If you’d like to check out the other 9 placemat projects, CLICK HERE FOR A FULL PLAYLIST ON MY YOUTUBE CHANNEL

IMG_0437

Placemat V4-8

Placemat-3

Fabric labels-5-2Pioneer WOman Pouches-2Tool-Caddy

PW Cosmetic (1 of 1).jpg

Canvas & Faux Leather Tote Bag

canvas leather tote bag-1

Many of you have messaged me and asked for projects that utilize faux leather.  Today, I give you the leather/canvas drop cloth tote bag.

canvas leather tote bag-5

Yes, we are using more of that canvas drop cloth that we used in Pillow Covers, the Shabby Fabric  Basket , and the Canvas Zipper Pouch.  We are getting a lot of mileage out of a simple paint drop cloth.

Tissue Pouch-2

I made both versions of this bag with Cricut Designer Fabric.  They have an amazing bundle right now that will really add to your fabric stash.  Both of the totes above were made from the fabric bundle.  They are currently phasing out fabric, so once this bundle is gone, it’s gone for good.  It’s a $129.90 value, on sale for only $39.99.  Psst… if you’re a Cricut Access Member you’ll save 10% off that price and use my code MAKERS10 and you will save ANOTHER 10%.  That is a whole lot of fabric at a very affordable price.

Tissue Pouch-3

This black and metallic rose gold is really striking in person.  Even if you don’t use a Cricut, this fabric is a great deal.  I didn’t use the Cricut for this project, but I still used the fabric.

Are you ready to make your own canvas and leather tote bag?  I’ve got you covered with a video that includes step by step instructions!

How to make a Jumbo Tote Bag

Jumbo Tote Bag-1Hello and thanks for stopping by!  Today, I am excited to bring you this super handy “How to Make a Jumbo Tote Bag “tutorial.

Jumbo Tote Bag-4

My daughter asked me to make something for the grandkids that they could take their “stuff” to day care in.  It needed to be large enough to hold their nap blanket and pillow, an extra set of cloths and all of the other essentials, but it also needed to be soft a flexible enough they could fold it up and store it in their cube at daycare.

Jumbo Tote Bag-8

I came up with this pattern.  I used outdoor fabric for durability and fusible fleece to give them a bit of structure, but still soft and foldable.

I am in love with how they turned out.

By simply adjusting the size of the fabrics, you can make a tote for almost any occasion using this design.  It’s the perfect beginner sewing friendly project.

Ready to make one?  Here’s your step by step tutorial:

Mini Tote Bag with/or without the Cricut

minitote-4

A while ago, I posted a miniature tote bag I made for someone for Christmas.  I have been asked over and over to post the directions for this mini tote.  Today, I made the tutorial and just to change it up a little I made 3 different sizes.

minitote-3-2

and used 3 different patterns

48377487_349912695788674_5008568767836323840_n

I wanted to show how versatile a simple basic tote bag pattern can be.  Simply change the size, add a pocket, add a keychain, a bow or some pompoms and it looks like a totally different project.

I used the Cricut Maker to cut my fabric, but you can absolutely cut it by hand.  I give you the step by step instructions as well as all of the measurements in the video tutorial below.

Which one is your favorite?

Watch the tutorial here:

Cricut Maker Facebook Group: https://www.facebook.com/groups/cricutmaker/

Cricut Easy Press Facebook Group: https://www.facebook.com/groups/CricutEasyPress/

*****
Social Media Info

Facebook: https://www.facebook.com/lorrienunemaker/

My blog: http://www.lorrieNunemaker.com/

Pinterest: https://www.pinterest.com/lanunemaker/

Instagram: https://www.instagram.com/lorrie_nunemaker/

Youtube: http://youtube.com/LorrieNunemaker
*Disclaimer:  Links above are affiliate links.  By clicking on these links I may earn a small commission at no cost to you.  Some products may have been provided to me by vendors, however, all opinions and reviews are strictly my own.

Cricut Fusible Fabric!

Cricut Fusible-1

Hey there!  Have you heard the great news?  Cricut now has FUSIBLE FABRIC!  What is fusible fabric?  Well it’s cotton fabric that already has a fusible product on the back so that with the use of an iron or the Cricut EasyPress you can make your very own fabric applique projects!

Cricut Fusible-5

I wanted to make a little Cricut care package for a friend, so I cut out a Cricut “C” with my Cricut Maker and applied it with the EasyPress.  It was so easy and so fast to make this adorable miniature tote bag!

Cricut Fusible-3

Hint… you can find this Cricut Logo in the Cricut Library.. just search “Cricut”.

Cricut Fusible-2

There are tons of varieties of colors.  Each roll of Fusible Fabric comes with four different designs.  Here are some of the choices available:

Screen Shot 2018-06-12 at 2.32.34 PM

Screen Shot 2018-06-12 at 2.32.47 PM

Screen Shot 2018-06-12 at 2.32.41 PM

Screen Shot 2018-06-12 at 2.32.29 PM

I really want to collect them all!  (Don’t judge.. I know I have a problem!) . They are so cute!  I can think of so many projects to use them on.

The Cricut Fusible Fabric is available now!  You can save an additional 10% and get free shipping with my code LORRIE and if you are an Access member you will save ANOTHER 10%!  Quite the deal, right!?!?!

I put together a little video showing how I made the totebag!  I can’t wait to sew what you make!

Cricut Fusible Fabric available NOW!

Buy it here: http://shrsl.com/1049x
Use code LORRIE and save 10% and get free shipping!

Cricut EasyPress: http://shrsl.com/jljn
Cricut Easy Press Mat: http://shrsl.com/zz3w


Disclaimer:  Links above are affiliate links.  By clicking on these links I may make some change at no cost to you.  Some products may have been provided to me by vendors, however, all opinions and reviews are strictly my own.

Beach Towel Tote Bag!

Beach bag-1

Hello there!  It’s finally starting to look like Summer here in Indiana and that means beach time and lots of running around.  I can always use an XL tote to keep me organized from one place to the next.  I created this fun bag from a beach towel!

Beach bag-1-5

You can’t even believe how easy it is!  I made this in under 30 minutes and you can too!  This is the perfect beginner sewing project.  ( How cute is this “Tropic like it’s Hot” SVG from LoveSVG?)

Beach bag-3

The best part is, it’s so easy to throw in the laundry with your other towels, it’s easy to personalize (make one for each of the kiddos with their own name), it’s is so big you can use it for the beach, a diaper bag, sleepovers, you name it – I’m pretty sure it’s going to fit!  If you want it a little smaller, it’s really easy to downsize, simply cut your pieces smaller.

Beach bag-1-4

I personalized my bag with the Cricut EasyPress.  I used the cotton settings and made sure to press from both the inside and outside of the bag.  I used Glitter Iron On and Regular Cricut Lite Iron On.  (Hint:  use code LORRIE and save 10% and get free shipping on Iron On and other Cricut Accessories).   I used pretty towels from Walmart, but any beach towel would work.  Are you ready for the step by step tutorial?