ID / Badge Holder – FREE Pattern and Tutorial – Beginner Friendly

ID TAG-8

I finally got to see my son and daughter-in-law this past weekend.  It had been months and I was certainly happy to see their sweet, smiling faces!  Maggie, asked me if I could create an ID tag for her to put her work ID in and attach to her key chain.  Of course, I obliged and quickly went to work on a very simple pattern.ID TAG-4

She requested a verticle tag since it was going to be hanging from her key chain.  I whipped up a super simple tag on my embroidery machine, but I was afraid she’d lose her ID and anything else she put in it.  I decided to create a new pattern with a bit more protection.

ID TAG-2

This is what I came up with and I am thrilled with it.  It is still super simple and takes very little product, but it’s ultimately safer and, lets face it, prettier.  I love that it can be made either vertically and horizontally, depending on your needs.  I also like the lobster clasp attachment which can easily be attached to a lanyard, backpack or keychain.

If you have a Cricut or other digital die cutting machine that can cut fabric with an SVG, this project is going to be super simple for you, because I made an SVG.  You can get it by clicking HERE.  No Cricut, no worries, you can grab the printable PDF pattern by clicking HERE.  Be sure when printing that you print at actual size and not scaled.  There is a guide at the top of each page to measure and make sure you printed it correctly.  When downloading the ZIP file for your digital die cutting machine, be sure and double click the ZIP file to open it and then upload the file ending in .SVG.

Enough of the small talk, let’s start making ID tags!  Be sure and tag me on social media if you make them.  Join my Facebook Groups and post photos!  I love it see them!

Here is the step by step video tutorial:


Parkside Tote – Collaboration with OklaRoots

parkside1

I have been so excited to release the Parkside Tote Bag.  OklaRoots and I collaborated on this super fun, super practical tote bag.

IMG_6053

We are both bag makers.  She is also a quilter – I want to be a quilter.  Neither of us have the time to commit to a full size quilt everytime we want to quilt, so we decided to combine our two loves and voila… the Parkside Tote was built.

Jess over at OklaRoots designed the quilt block just for you.  It is perfectly sized and pieced together to fit within the construction of this tote.  You can visit her blog and Youtube to find out how to make the quilt portion of the bag, pick up the PDF templates and she’s even got SVGs for all of you digital die cutting makers.

IMG_3399Then stop back here and I’ll show you how to construct the bag.  I’ve got a PDF for you with all of the dimensions for the fabric portions of the bag.  You can get it HERE.

parkside4

There is so much room inside of this bag.

parksdie3

I bet you can’t just make one!!!IMG_4937.jpg

So, grab some fabric, vinyl, cork or whatever your preference is, and let’s get started!

Triangle Pouch

Triangle Pouch-1
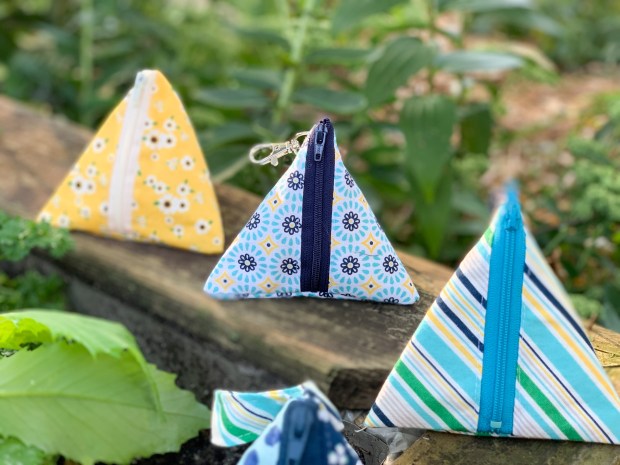
Triangle Pouches are super fun to make and they look harder than they really are.  It’s really just a few straight seams and you’re done.

Triangle Pouch-1-2

I looked around at Pinterest and Youtube and couldn’t find any tutorials showing how to fully enclose all the of the seams in the lining.  I really love the simplisity of the patterns I saw on Pinterest, but I didn’t love seeing the raw edged seams on the lining.  I wanted the inside to be as pretty as the outside.

Triangle Pouch-2

So, I created my own tutorial with a completely finished linining.  It’s really not hard at all and only adds 2 extra steps.

Triangle Pouch-3

They turned out great and I can’t wait to give a few to some friends.  They are also the perfect STOCKING STUFFER size!  You could add a chapstick, handsanitzer or something fun and stuff them into the stocking or even hang them from the stocking.  So many ideas.

Are you ready for the tutorial and to find out how I enclosed all of the seams?  Here you go!

Grab and Go Wristlet – FREE PATTERN

IMG_3547

Hello!  Can you believe it’s almost JULY?  June has flown by!  I have been super busy.  I just got back from the Cricut Meet and Greet in Chicago where we celebrated the launch of the Infusible Inks with Michaels! (More to come on that later).  Today, I am excited to share with you my very own pattern/design which I call the Grab and Go Wristlet!

Wristlet LAN-1

This little cutie is the perfect size for the summer when you just want to take your key, phone and a few necessities without the added bulk of an oversized purse.

Wristlet LAN-1-2

This little cutie actually has quite a lot of room in it and yet, it’s still a clutch size.  I just love the fun colors.  Wristlet LAN-3

You can’t help but be happy when you see Pink Lemons and Palm Trees, right?

Wristlet LAN-4

I designed this bag so that it can easily be converted to a crossbody bag for when you need your hands free for shopping or chasing kids!  (I remember those days :), I actually miss them very much).

Are you ready for a tutorial:  I have a FREE SVG (perfect if you have a Cricut Maker), or you can choose the FREE PDF pattern and cut it by hand.  You can get them by clicking below:

GRAB & GO SVG PATTERN **                     GRAB & GO PDF PATTERN

** For whatever reason, when uploading the SVG to Cricut Design Space, Design Space is resizing it.  Resize the SVG to 23.5″ wide (Keep lock proportions on).  This will create a finished pouch that is approximately 9 x 7.

Here are the step by step video instructions:


How to Make A Luggage Tag

Luggage tag-2

May is full of travel plans for me.  I’ve been working on this vinyl project series, so let’s make vinyl/faux leather luggage tags!  How cute are these?!!?

Luggage tag-4

I have found so many fun materials to use, like this Cricut Faux Leather, or this

Luggage tag-5

yummy pink glitter faux leather.  I mean does it really even get any better than pink glitter?

Luggage tag-6

This one was made with my friend, Teri, in my mind.  Leopard is her family tartan.  She swears it’s true! 😉 . I found this print in the ribbon section at Hobby Lobby.

Luggage tag-7

This one is probaby my favorite! It’s so stinking cute!  It’s more shiny and bright than the others.

Luggage tag-9

Did I mention you can totally use Cricut Iron On with the Cricut EasyPress to personalize?  Maggie is going to love this one!

Want to know the best news?  I’ve got a downloadable PDF pattern for you.  If you have a Cricut, I’ve even got the cut file for you.

PDF PATTERN (CLICK HERE)                               CRICUT DESIGN SPACE FILE (CLICK HERE)

iI you create one or two or five, please be sure and tag me on social media!  I would LOVE to see them!

This is probably one of the fastest, easiest tutorials I have made.  You can watch it all in the step by step video tutorial here:


*Disclaimer:  Links above are affiliate links.  By clicking on these links I may earn a small commission at no cost to you.  Some products may have been provided to me by vendors, however, all opinions and reviews are strictly my own.  This is not a sponsored post.

Clear Vinyl Project Bag

clear project bag-1-2

Well hello there!  If you’ve been following along with my Clear Vinyl Bag Series, you’re about to see the newest in the lineup!  The Clear Vinyl Project Bag!

clear-project-bag-3.jpg

These are the perfect size for on the go projects.  I love that you can easily see what is inside.  I think they are pretty cute, too!

drawstring pvc-3

Check out this one!  I used the purple vinyl for Evie’s Minnie Mouse Bag.  I can see her Teddy Bear peaking out!

I have got all of the details and step by step instructions over on my youtube channel.  You can find out more here:
 

Fruit Zipper Pouches with the Cricut

IMG_2399

Alright guys!  I’m back with another clear vinyl pouch!  This is a really fun project and really easy!  There are so many possibilities using this technique, your Cricut and a little bit of vinyl.  You can create a shaped pouch for virtually any shape!

The kids are sure to love them!   Watch the step by step tutorial over on my youtube channel!

Clear Vinyl Bags! So Fun!!

vinyl-pouch.png

You guys!  I have been laying in bed at night dreaming of vinyl bags!  I am having so much fun working with this clear vinyl.  I have an entire series coming up with lots of fun ideas and ways to use it.

Clear Vinyl Bags

Today, we are going to start with this very basic simple pouch.  I think it is super cute and I can think of a million uses.

I used the Cricut to add a bit of fun personalization and I think it takes the cuteness factor over the top!

Find out everything you need to know to create your own in my YouTube tutorial here:

Shabby Fabric Basket

IMG_1950

I am so happy about this Shabby Fabric Basket.  This project came together so quickly and so easily and even better, so inexpensively!

IMG_1952

You may remember my original fabric basket from a placemat video.  This basket is a DIY inspired version of that one and it’s almost just as easy to make.  Fabric baskets are so popular.  You can use them for organization, a flower pot cover, as a decorative element or a whole plethora of other uses.

IMG_1931 2

I made this one for my friend, Teri, who is a leopard loving pink girl.  It is fun and lively, much like she is.

I also toyed with the idea of adding Rae Dunn inspired words to a bag.  What do you think?

Screen Shot 2019-04-06 at 2.55.17 PM

Change the fabric and you’ve got an Easter Basket, a Mother’s Day Basket, a gift basket, and more.

As always, I’ve got a step by step tutorial for you.  You can find it below.

Personalized Gift Box with the Cricut EasyPress

woodenbox-3

Hi there and welcome back.  Today, I am sharing how I made this personalized wooden gift box.

woodenbox-7

You may recall last week, I made this personalized flask and matching etched shot glasses for my son to use to ask his friends to stand up with him in his wedding.  We wanted to present them in a wooden box.

woodenbox-4

I decided to use Cricut Vinyl Iron On rather than adhesive vinyl.  Adhesive vinyl can be hard to adhere to wood because it doesn’t want to grip easily.  Iron on is the perfect solution.  The small 6 x 7 Cricut EasyPress made it even easier.

woodenbox-2

We are really pleased with how this whole gift set turned out.  Watch the step by step tutorial to find out what settings I used on the Cricut EasyPress and a few tips when applying iron on to wood.