Vaccination Card / ID Holder – FREE PATTERN (Cricut & PDF) Easy Beginner Sewing Project


I wanted to create a very simple card holder to put my recent vaccination card in.  I designed this very easy, but practical solution.  I used my Cricut to cut out the faux leather and felt.  If you don’t have a Cricut, keep reading, I’ve got a solution for you.


When I was designing the ID Pouch I wanted something that I could easily clip to a lanyard, my keychain or wherever I might need to show my proof of vaccination.  A simple swivel clip made it so that I could easily add and remove it when necessary.  I also wanted to be sure it would be secure in the pouch, so I added a simple Kam Snap.

I have a Cricut Design Space file to share with you.  If you have a Cricut, you can get the Design Space file by clicking HERE.  No Cricut? No worries, grab the PDF file HERE.  It’s super easy to cut by hand.

If you have an embroidery machine, I’ve got an In the Hoop Version coming right after this tutorial… stay tuned.  It’s so cute!

Sneak Peek: 

Now, for the step by step (non-embroidery) tutorial see below:


How to make a Planner Pouch

DSC_0013

Hey there!  Thanks for stopping by! I had a few requests over in my Craft Crazy Facebook Group to create a tutorial for a planner pouch.  I grabbed my planner and got busy creating what I felt was a perfect size, but you can easily adapt it to fit your planner.

DSC_0001

I think it’s super practical and not just for planners.  Journal writers, students and list makers would also enjoy a pouch.  Keeping all of your planner stickers, writing utensils, clips, erasers, etc. with your notebook has never been easier, or prettier.

DSC_0003

This is a beginner sewing friendly tutorial. Don’t let the zipper scare you, I am going to walk you through it step by step… it’s easier than you think!

I would love it if you would tag me on social media when you make theplanner pouch.  You can find me by clicking here 

If you have a Cricut, I have a Design Space file so you can let the Maker cut the fabric and interfacing for you.  CLICK HERE FOR THE DESIGN SPACE FILE.

Are you ready to get started?  Here’s the tutorial:

Triangle Jelly Pouches

IMG_5641

I had an idea in the middle of the night and could hardly wait until it was time to get up so I could give this a shot.  The Triangle Jelly Pouch!

IMG_5633
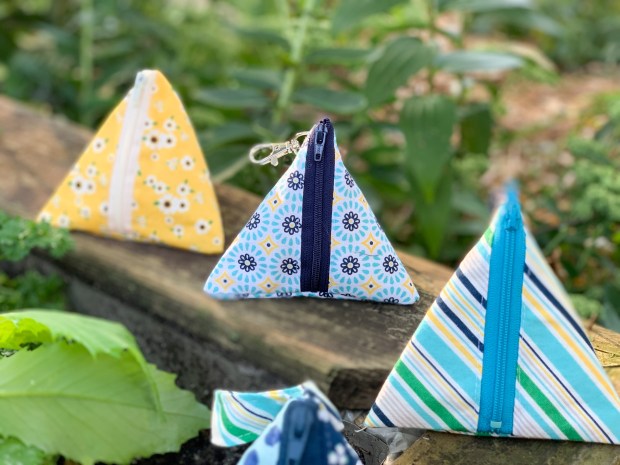
I had so much fun making the fully lined fabric pouches (you can find that tutorial here), that I thought what would be even more fun, than to create a clear version.

IMG_5632

I mean, seriously, how cute would these be hanging off a backpack, or even just stuffed with treats.  I would totally use that purple one and fill it with Halloween Goodies for the kids.

IMG_5633

You could also make these out of faux leather or vinyl for another look.  Check out one of my favorite shops on Etsy called Sew Hungry Hippie.  She’s got so many fantastic selections of vinyl and faux leather.

Are you ready for the tutorial?

Triangle Pouch

Triangle Pouch-1Triangle Pouches are super fun to make and they look harder than they really are.  It’s really just a few straight seams and you’re done.

Triangle Pouch-1-2

I looked around at Pinterest and Youtube and couldn’t find any tutorials showing how to fully enclose all the of the seams in the lining.  I really love the simplisity of the patterns I saw on Pinterest, but I didn’t love seeing the raw edged seams on the lining.  I wanted the inside to be as pretty as the outside.

Triangle Pouch-2

So, I created my own tutorial with a completely finished linining.  It’s really not hard at all and only adds 2 extra steps.

Triangle Pouch-3

They turned out great and I can’t wait to give a few to some friends.  They are also the perfect STOCKING STUFFER size!  You could add a chapstick, handsanitzer or something fun and stuff them into the stocking or even hang them from the stocking.  So many ideas.

Are you ready for the tutorial and to find out how I enclosed all of the seams?  Here you go!

Continous Zipper Pouch

COntinuous Zipper Pouch-2

Hello and thanks for stopping by!  Today, I am excited to share this fun continuous zipper pouch.  What does that mean?  Let’s take a closer look.

COntinuous Zipper Pouch-1

Notice the continuous zipper with no end?  Isn’t that super fun?  I love it.  This little boxy pouch is perfect for so many things.

COntinuous Zipper Pouch-12COntinuous Zipper Pouch-13

You can make them most any size.  Hello, lovely Easter Pouch.

COntinuous Zipper Pouch-15

Reach into the scrap fabric pile and create something a little more patchworky… is that a word?COntinuous Zipper Pouch-16

No matter how you mix it up, you will find tons of uses for these unique little gems.

COntinuous Zipper Pouch-3

I’ve got all of the directions and sizes included in the video below.  If you have a Cricut Maker you can even grab the Design Space File HERE.  No Cricut?  No worries, I’ve got you covered. You can easily cut this by hand.

Here’s the step by step tutorial and all of the information you need to make one of your own today!

Project Bag – Free Pattern & Tutorial

Rae Dunn Pillow-1

Well hello there! Thanks for stopping by!  Today, I’m going to show you how to make this really fun Project Bag.  You can customize this to almost any size.  It’s a really easy sew.

Rae Dunn Pillow-6

I love that this bag cinches closed, but also opens up wide, and stands on its own so you can carry your project with you safely and work right out of the bag!

Rae Dunn Pillow-4

The boxy bottom gives it balance and a roomy interior.  I love working with cork fabric like this amazing pink cork!  Swoon!

Rae Dunn Pillow-3

These gorgeous Windham Fabric are to die for!

I’ve got a Cricut Design Space File for you or you can cut this by hand.  It’s all included in the video on my Youtube Channel.

Ready for the tutorial?  Here you go!

Round Make Up Bag with The Cricut

DSC_0002

Hello and thanks for stopping by!  Today, I have a new make up pouch tutorial for you.  We have all seen this style of make up bag, but did you know how EASY they are to make on your own?

DSC_0005

I even added a vinyl lining which makes it easy to wipe up any spills or powders that can get inside a make up pouch.  It’s not just me that is messy, right?

DSC_0011

Or leave the vinyl out, like the one above and use it for your jewelry when traveling or your child’s legos… there’s never a shortage of uses for a pouch!

DSC_0003

If you don’t have a Maker, yet, never fear because I have a work around for you.  I bet you have a dinner plate and that will work just fine, too!

DSC_0006

You can whip these up in time for Christmas gift giving!  They take very little supplies and picking the fabrics is half the fun!

Ready for the tutorial?  Grab the Design Space file HERE.

Create a Pattern & Card Wallet with the Cricut Maker & HeatnBond

I am having so much fun with my Cricut Maker!  Everyday, it seems, I dream of things to make and patterns to create.

Card Wallet-4

Last night, I got home from work and immediately started working on designing a pattern for these cuties that the Cricut Maker could cut out for me.  It was super easy, and the fact that the Cricut Maker not only cut out my fabric and interfacing, but also drew my seam allowances, made making these super easy – even for a beginner sewist, like me!

Card Wallet-10

These are the perfect size for business cards or credit cards.  I love using small wallets like this for a quick run to the grocery or after school sport events.

Card Wallet-15

I added a keyring so that you could easily clip your car keys or even a lobster clasp could be added to clip it to a backpack or purse.

I used Heat N Bond Fusible Extra Firm interfacing to create the perfect firmness to these little gems.

The fun fabrics are from a Pioneer Woman Placemat (top left $3.47 from Walmart), Fabric Editions (top right and lower left – $0.97 from Walmart) and some fabric from my scraps bin from Riley Blake (lower right).

Wanna make one?  Guess what?  I’ve got a tutorial for you!

Placemat Zipper Pouch

Pioneer WOman Pouches-1

This, by far… has been one my most popular video tutorials and, probably one of the easiest!

This is a Box Zipper Pouch made from a Pioneer Woman Placemat from Walmart!  Not even joking!

Pioneer WOman Pouches-5

These are really practical.  They are the perfect size for cosmetics, traveling toiletries and even craft projects.

The best part… the quilting is already done for you.  All you need to do is add a zipper and few stitches and voila… you’ve got a gift in less than 15 minutes.

Want to make one?  Guess what?  I’ve got a video tutorial for you!  Here you go!

Card Wallet from a Placemat

We are making card wallets today and the best part about it is –   We are making them from a placemat!  These are oh so easy and the perfect project for the beginner sewists, like me!

I recently went to Creativation in Phoenix and needed something to carry my business cards to the show.  I bought a boring little magnetic metal pouch to take to the show, but I was thinking this morning that there must be a cuter alternative.

Which led me to my craftroom and my Pioneer Woman placemats.  I whipped up a couple of these in less than 30 minutes.  The only supplies you need are a placemat, ruler, magnetic closure, a piece of coordinating fabric and your sewing machine.

Ready to make one?  You guessed it!  I’ve got a video tutorial for you.  Please tag me on social media if you make one!

Please note affiliate links may be used above. Clicking these links help support this channel at no cost to you.