How to Sublimate a Slap Wrap for a Can/Bottle Koozie

Are you looking for stocking stuffer ideas? I’ve got a fun one for you!

This is such a fun and unusual koozie. When my children were little they had bracelets that worked the same way that slap wrap can koozies work the same way.

I think they are the perfect stocking stuffer, great for football game parties, themed parties and holidays.

This Slap Wrap was a part of the JP Plus Subscription Trend Box that ships in December. If you want to be sure and get this particular box be sure an order no later than November 15th, 2020. To see what else is in this box you can check out my video by clicking here. The Subscription box is full of fun and unusual sublimation blanks.


You can find the Sublimation Slap Wraps here. You can use coupon code 9PSR5 and save an additional 15% off your order of any blanks.

I have created a step by step tutorial so that you can create some of these fun Slap Wraps.

Bowl Koozie with Free PDF Pattern

Bowl Koozie with PDF

I am revisiting an older project.  The bowl koozie.

The original video I made with this fun pattern was focused around the Cricut.  You can see it here.

Screen Shot 2020-05-05 at 2.13.43 PM

Cricut added my original design to Cricut Design Space.  If you have a Cricut you can easily cut out the shapes.  The Design Space File is available by clicking here.

This time I wanted to make the Bowl Koozie easy for those who don’t have a Cricut.  I have created a FREE PDF Bowl Koozie Pattern so that anyone can make this fun, beginner friendly sewing gift.

If you are new to my channel, or new to sewing, this project is the perfect for you!  Even seasoned sewists, love making koozies.  I’ve got a step by step tutorial for you to make it super easy to get started.

The bowl koozies make wonderful gifts, craft fair items and they are just great to have around for everyday household use.

If you’d like to start creating and follow along with me in a video tutorial, click below.  I’d love to see your Koozies.  Don’t forget to join my Facebook Group and post your photos!

Facebook Groups:

Craft Crazy with lorrie nuneMAKER

  Sewing Patterns and Tutorials with lorrie nuneMAKER

Here is the step by step tutorial:


Drawstring Tote Bag

IMG_8914

I have been wanting to create this drawstring tote bag tutorial for awhile now, but I got sidetracked with mask making.  I thought it would be a fun time to create this quick and rather easy tote bag.

IMG_8912

I used this great PUL fabric on the inside that makes it water resistant and easily wipeable, which means, it could easily double as a make up bag, lunch tote or use it for just about anything you’d use a tote bag for.  The finished size measures about 7 x 6 x 10″.

IMG_8909

I have a step by step tutorial linked below.   If you have a Cricut Maker  you can cut all of the pieces with your Maker.  No Maker, no worries.  I have a PDF with the dimensions here, you can easily handcut each piece.

So, are you ready to make a couple of cute drawstring totes?  I bet you can’t make just one!  I know, I couldn’t!  If you make one, please post on social media and tag me.  You can find all of my links in the video description.  I love to see what you are making!

How to Make Fabric Rope

DSC_0034

This is another really easy, but fun project.  I love to make fabric twine/rope while watching tv.  I am not a person who can just sit idle, I need my hands to be doing something.

DSC_0047

Last night, while watching a movie, my daughter in law and I made these balls of twine.  They turned out so beautiful.

DSC_0043-2

Today, I took her ball of twine and made it into this cool trivet.  The smaller one is a coaster.

DSC_0045-2

It is truly a one of a kind rope and I kinda love it!  The best part?  It’s made with nothing more than fabric from my scrap bin!  What a wonderful way to recycle your scraps.

DSC_0045

I plan to keep going with my ball of twine and hope to make a rug out of it.  They are fully washable (I know that’s what you were thinking when I said rug!).

So, do you want to learn how to make some scrap busting fabric rope?  I have a step by step tutorial.  I would love it if you make some if you would tag me on my social media channels and Facebook Groups. You can find me by clicking HERE.

Here’s the tutorial:

Brinkley Double Zipper Pouch / Cross Body Bag

IMG_5800Thanks for stopping by!  I am so excited to share with you the Brinkley Double Zipper Pouch / Cross body Bag.  This is a fun and practical bag.  It features two zipper pockets

IMG_5792

as well as a surprise third pocket in the middle.  It’s super roomy.  I can easily fit my iphone XS Max inside the smaller pouch with plenty room to spare for keys, wallet, etc.

IMG_5807

I made two different sizes.  The smaller size is approximately 6 x 8 and the larger is 8×10.

IMG_5821

I love that you can easily switch between a clutch to a cross body bag by simply changing the detachable strap.

The measurements are as follows:

2 Outer Fabrics 8″ x 10″ (small size 6 x 8) .

2 Lining Fabrics 8 x 10 (small size 6 x 8)

2 Fusible Fleece cut to 7.5 x 9.5

1 Fabric for wristlet strap 3″ x 15″ (lengthen or shorten to your preference)

1 Fabric (or vinyl) 2 x 4″ for tab

1 D-ring / 1 Swivel Lobster Clasp

I will be making several of these for Christmas gifts.  Are you ready to make one (or three?).  Get your zippers, some cute fabric and your favorite beverage and let’s get making!!  Here is a step by step tutorial for you:

Triangle Jelly Pouches

IMG_5641

I had an idea in the middle of the night and could hardly wait until it was time to get up so I could give this a shot.  The Triangle Jelly Pouch!

IMG_5633
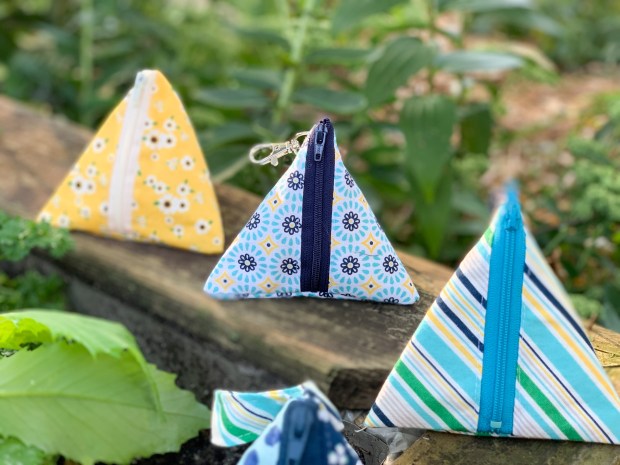
I had so much fun making the fully lined fabric pouches (you can find that tutorial here), that I thought what would be even more fun, than to create a clear version.

IMG_5632

I mean, seriously, how cute would these be hanging off a backpack, or even just stuffed with treats.  I would totally use that purple one and fill it with Halloween Goodies for the kids.

IMG_5633

You could also make these out of faux leather or vinyl for another look.  Check out one of my favorite shops on Etsy called Sew Hungry Hippie.  She’s got so many fantastic selections of vinyl and faux leather.

Are you ready for the tutorial?

The Ashley Tote Bag

Ashley-Tote-YT

Hi there!  Over in my Craft Crazy with Lorrie nuneMAKER Facebook Group I posted a bag similar to this quite awhile ago.  It was this bag:

IMG_5139 2

and boy did I have a lot of request to make a tutorial.  Life got in the way… my son got married.  I have been so busy with wedding planning, guests every weekend, that I just didn’t have time to create a tutorial.

I did, however, take the time one afternoon to make a mock up so that I could get the dimensions down.  I came up with this tote:

IMG_5147 2.jpeg

Today, I finally had a chance to take a little bit from each bag and change it up just a little more and create the “Ashley” tote.  I love it so much.

Ashley Tote-4

The fabric makes me happy and the quilting just gives me all the feels.

Ashley Tote-6

Green and white polka dot?  I mean, c’mon!

Ashley Tote-5

Of course, I have a step by step tutorial for you.  You can find it below.  I have written down all of the dimensions for you.  You can get them in my shop HERE.

Here’s the video tutorial:   

Wrigley Sliding Pouch

Wrigley-Sliding-Pouch

Hello!  Thanks for stopping by!  I am excited to share today’s tutorial with you.  It is the Wrigley Sliding Pouch!  I just love this project and I think it will be the perfect addition to your craft room.

IMG_5266.jpg

It features a fun sliding sleeve that collapses and reveals the perfect pen/tool holder for your desktop, but also conveniently expands and closes up so that you can easily take it with you.

IMG_5268

It’s the perfect gift for teachers, students or any crafter.  Pens, Markers, Tools, or Sewing Notions fit perfectly inside.

I created a PDF and SVG pattern. You can use your Cricut Maker to cut the SVG, or simply print the PDF and cut your pattern by hand.   You can find them by clicking below:

                                     PDF and SVG Pattern                             

Once you have the file, watch my step by step tutorial to create your very own Wrigley Sliding Pouch.

Pocket Placemat

joann placemat-9-2

Well hello there!  I am happy you are here!  Over in my Craft Crazy Facebook Group. I had a group member ask if I would create a tutorial on this super cute pocket placemat!  She found this wonderful tutorial over on the Joann Fabric website and wanted to see a video tutorial.

joann placemat-1-2

I mean what is not to love about this cutie?  It’s so fun and I can think of a ton of ways to change it up, like this one:

69553325_10157469364091870_7904213054257102848_n-2

A quick change of fabrics and embellishments and you’ve got a Halloween Placemat.

Joann Fabrics did an amazing job of writing out the tutorial, but if you’d like to see a video, step by step tutorial click below:

Triangle Pouch

Triangle Pouch-1Triangle Pouches are super fun to make and they look harder than they really are.  It’s really just a few straight seams and you’re done.

Triangle Pouch-1-2

I looked around at Pinterest and Youtube and couldn’t find any tutorials showing how to fully enclose all the of the seams in the lining.  I really love the simplisity of the patterns I saw on Pinterest, but I didn’t love seeing the raw edged seams on the lining.  I wanted the inside to be as pretty as the outside.

Triangle Pouch-2

So, I created my own tutorial with a completely finished linining.  It’s really not hard at all and only adds 2 extra steps.

Triangle Pouch-3

They turned out great and I can’t wait to give a few to some friends.  They are also the perfect STOCKING STUFFER size!  You could add a chapstick, handsanitzer or something fun and stuff them into the stocking or even hang them from the stocking.  So many ideas.

Are you ready for the tutorial and to find out how I enclosed all of the seams?  Here you go!