Well hello there! I am happy you are here! Over in my Craft Crazy Facebook Group. I had a group member ask if I would create a tutorial on this super cute pocket placemat! She found this wonderful tutorial over on the Joann Fabric website and wanted to see a video tutorial.
I mean what is not to love about this cutie? It’s so fun and I can think of a ton of ways to change it up, like this one:
A quick change of fabrics and embellishments and you’ve got a Halloween Placemat.
Joann Fabrics did an amazing job of writing out the tutorial, but if you’d like to see a video, step by step tutorial click below:
Triangle Pouches are super fun to make and they look harder than they really are. It’s really just a few straight seams and you’re done.
I looked around at Pinterest and Youtube and couldn’t find any tutorials showing how to fully enclose all the of the seams in the lining. I really love the simplisity of the patterns I saw on Pinterest, but I didn’t love seeing the raw edged seams on the lining. I wanted the inside to be as pretty as the outside.
So, I created my own tutorial with a completely finished linining. It’s really not hard at all and only adds 2 extra steps.
They turned out great and I can’t wait to give a few to some friends. They are also the perfect STOCKING STUFFER size! You could add a chapstick, handsanitzer or something fun and stuff them into the stocking or even hang them from the stocking. So many ideas.
Are you ready for the tutorial and to find out how I enclosed all of the seams? Here you go!
I am back with another Scrunchie tutorial! Who would have thought that Scrunchies would be back in style! I am seeing them everywhere and in lots of shapes and sizes.
I created the EVIE Scrunchie with my grand-daughter in mind, obviously. I think it is adorable. I am a sucker for all things bows.
The beauty of the Scrunchies is that you can mix and match the Urban Scrunchie with the Mini Scrunchie with the Evie Scrunchie. They all work similarly and together. I was inspired to make this set from the headband tutorial I showed you last week using the Urban Scrunchie Mini. I just love the rainbow of color and Evie will have an accessory for every outfit.
Hi there! I am happy you are here. It is a beautiful Sunday evening here in South Bend, IN and I just finished whipping up a few of these Double Zipper ID Pouches.
I used my Cricut Maker (you can use the Cricut Explore, too) to cut the Cricut Faux Leather, fabric and even the clear vinyl window.
I created this pattern with travel in mind, whether it’s a simple as a trip to the grocery or travel through an airport. It’s got a secure pocket for your ID and a larger, middle pocket for cash, keys or whatever you may need.
You can use the handy side clip to add a wrist strap, or to hang on a bookbag, tote bag, keys, etc.
I think this is going to be another great stocking stuffer idea!!
Today, I have a super fun, super easy project for you! You can make this with or without the Cricut in just a few minutes. They are perfect for to school and moms on the go.
You won’t be able to stop at just one! They are quick to make. I can see lots of stocking stuffers in my future!
Don’t forget to use the Cricut EasyPress to personalize with Iron On!
I’ve got a FREE Pattern (SVG & PDF). You can cut these so easily if you have a Cricut. If you don’t have a Cricut use the PDF and create a pattern you can cut with scissors. You can grab both patterns HERE.
Ready for the step by step instructions? Here you go!
Hey there! Just a quick post to let you know I just released a NEW Video Tutorial for these fun Urban Scrunchies. I am so happy with how they turned out. They are a quick and easy project and a great scrap buster! Watch the video for step by step instructions.
If you have a Cricut you can use my FREE SVG PATTERNto cut them out with your Cricut Maker. If you prefer to cut by hand, I’ve got a PDF for you as well! These are Drop Box downloads. You don’t need to download Drop Box. Simply click on the link and then click the 3 dots in the upper right corner and click download.
NOW AVAILABLE: Pick up an Acrylic or Wooden Template here. If you’re planning to create tons of Urban Scrunchies for your Etsy Shop, Friends and/or Family, this will cut your time in half! Watch how fast it is to cut your Urban Scrunchie pattern:
If you make them, I would love it if you would tag me on social media and please come join my Craft Crazy Facebook Group where thousands of others are sharing photos of projects they have created with my Tutorials
May is full of travel plans for me. I’ve been working on this vinyl project series, so let’s make vinyl/faux leather luggage tags! How cute are these?!!?
I have found so many fun materials to use, like this Cricut Faux Leather, or this
This one was made with my friend, Teri, in my mind. Leopard is her family tartan. She swears it’s true! 😉 . I found this print in the ribbon section at Hobby Lobby.
This one is probaby my favorite! It’s so stinking cute! It’s more shiny and bright than the others.
iI you create one or two or five, please be sure and tag me on social media! I would LOVE to see them!
This is probably one of the fastest, easiest tutorials I have made. You can watch it all in the step by step video tutorial here:
*Disclaimer: Links above are affiliate links. By clicking on these links I may earn a small commission at no cost to you. Some products may have been provided to me by vendors, however, all opinions and reviews are strictly my own. This is not a sponsored post.
Well hello there! If you’ve been following along with my Clear Vinyl Bag Series, you’re about to see the newest in the lineup! The Clear Vinyl Project Bag!
These are the perfect size for on the go projects. I love that you can easily see what is inside. I think they are pretty cute, too!
Check out this one! I used the purple vinyl for Evie’s Minnie Mouse Bag. I can see her Teddy Bear peaking out!
I have got all of the details and step by step instructions over on my youtube channel. You can find out more here:
You guys! I have been laying in bed at night dreaming of vinyl bags! I am having so much fun working with this clear vinyl. I have an entire series coming up with lots of fun ideas and ways to use it.
Today, we are going to start with this very basic simple pouch. I think it is super cute and I can think of a million uses.
I used the Cricut to add a bit of fun personalization and I think it takes the cuteness factor over the top!
Find out everything you need to know to create your own in my YouTube tutorial here:
Hey there! I wanted to pop on here really quickly and share with you a fast and easy project using more of the paint drop cloth that I used in the previous RAE DUNN INSPIRED PILLOW COVER Tutorial and also in the SHABBY FABRIC BASKET Tutorial. (Click to visit those block posts).
This $4 drop cloth is providing me with fabric for tons of projects! This zip pouch is perfect for personalization (think EasyPress Iron On).
If you’re a Cricut user I even have a Design Space pattern for you. You can get that HERE.


 Triangle Pouches are super fun to make and they look harder than they really are. It’s really just a few straight seams and you’re done.
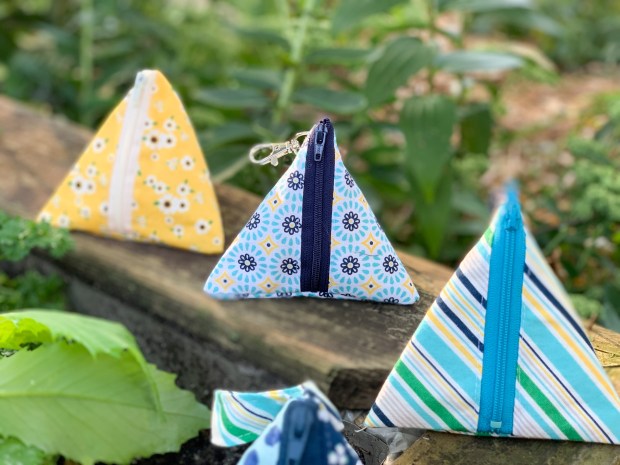


