Placemat Box Pouch with Embroidery

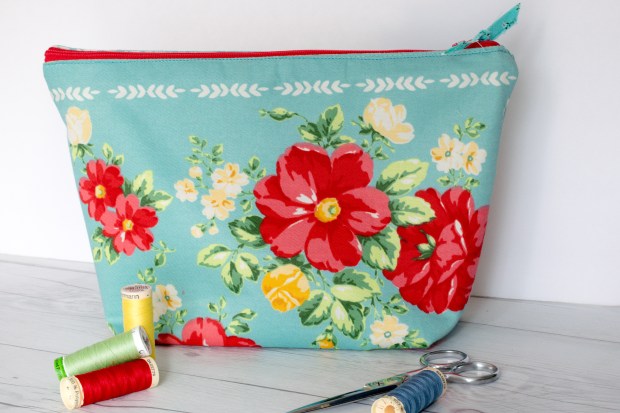
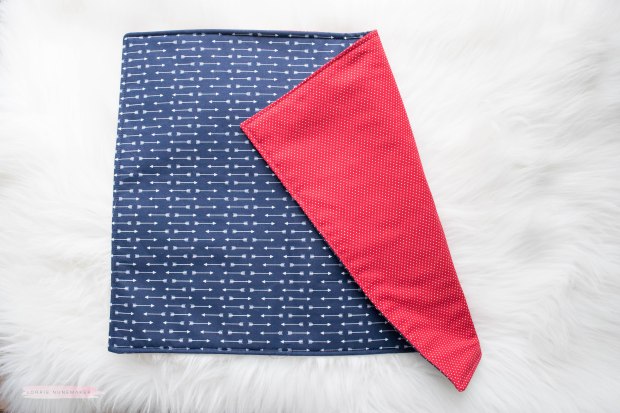
I am so excited about today’s video. It is a remake of this project I made several years ago. I had just started sewing when I made that video and never expected that it would have almost a half of a million views in a relatively short time. The beauty of this bag is that it is beginner-sewing friendly. There is something about using a placemat that makes it a little less scary for new sewists.

In today’s video I am going to show you the updated version of this super simple boxy bag which includes embroidery on the front as well as the new Pioneer Woman Placemats. The original placemat pouch became really popular in the embroidery groups on Facebook. In fact, that is what inspired me to begin my embroidery journey. I loved how they took my tutorial and stepped it up a notch by adding personalized embroidery monograms.

The fact that these pouches are so easy and inexpensive to make, make them the perfect holiday gift. My girls love them for make up bags, Evie loves them to carry her “stuff”, and I use several of them in my craftroom to keep things organized such as my Kam Snap kits.

They are also great sellers for craft fairs, etsy shops and boutiques.

If you don’t have an embroidery machine, you could easily swap out the embroidery for iron on/htv.

If you are interested in the multi-needle embroidery machine I have, I wanted to let you know that Ricoma is having a BLACK NOVEMBER sale (because 1 Black Friday is not enough for a sale this big). They have their lowest prices of the season for the entire month of November, 0% financing, FREE shipping and FREE embroidery software. The best prices are at the beginning of the month and will gradually increase throughout the month of November until they go back to full price. If you use this link you can save an additional $100.

If you are in the market for a single needle embroidery machine here are the ones I recommend. Keep In mind, I always recommend getting the largest hoop size that fits within your budget.4 x 4 Hoop Machine , 5 x 7 Hoop Machine, 8 x 11 Hoop Machine (This is my single-needle machine I’ve used in earlier videos)

Are you ready to make some quick and easy box pouches? Here’s the tutorial:

*Disclaimer:  Some links above are affiliate links.  By clicking on these links I may earn a small commission at no cost to you.  Some products may have been provided to me by vendors. All opinions and reviews are strictly my own.

Placemat Pouch Version 10! – The Tote

This is going to be a really quick post.  I started the Placemat Pouch Series over a year ago and the response has been overwhelming.  There are now 10 different placemat projects.

Today, I launched the newest member – Version 10 – The Tote.

Placemat 10

I am really happy with how this one turned out and I think the faux leather opens up a bunch of possiblities with the Placemat projects.  I’ve already got a few others lined up.

You can find the Step By Step Tutorial Here:

If you’d like to check out the other 9 placemat projects, CLICK HERE FOR A FULL PLAYLIST ON MY YOUTUBE CHANNEL

IMG_0437

Placemat V4-8

Placemat-3

Fabric labels-5-2Pioneer WOman Pouches-2Tool-Caddy

PW Cosmetic (1 of 1).jpg

Placemat Pouch Version 8!

DSC_0042

You keep asking for MORE placemat projects, and what can I say!  They are really a really easy sew! The Pioneer Woman Placemats make all 8 versions (plus one 1 wallet) a fast and easy project that make beginner sewist, like me, look like we know what we’re doing!

DSC_0040

This version I refer to as, the clear project pouch.  It’s perfect for keeping all of your notions together for a specific project/pattern.  I used a kam snap kit to close this one.

DSC_0045

You can also use a zipper.  I thought this one would be perfect to hang off the back of the car seat for the grandkids to keep there road trip entertainment in.  You can pack quite a bit into one of these little ditties!

DSC_0046

If you’d like to give version 8 a try, I’ve got a step by step tutorial for you!  Want to see all 9 placemat projects?  Watch the playlist here.

Placemat Pouch #6 – The Project Bag

IMG_0432

The Placemat Projects have sort of “been my thing”.  It’s funny, really, I never intended to create a whole series of pouches based off of these Pioneer Woman Placemats from Walmart.

I made another bag (not a placemat bag and someone asked me if it was made from a placemat.  I immediately knew that I could make something similar from a placemat, so I did.

IMG_0436

Enter, the Project Bag.  This is so easy to make and it’s absolutely the perfect size to carry your knitting, cross stitch, etc..  It has a wide open mouth to it that stays open, so you can work right out of the bag.  When you’re all finished, cinch it up and you’re project is safe and sound until the next time you’re ready to work.

IMG_0438

The six large outside pockets are the perfect place for keys, wallet, phone, etc.

IMG_0432

So.. you want to know how to make version #6?  Here’s a step by step tutorial:

Camping, anyone?

camping bag-1.jpg

Happy Saturday!  I wanted to share another idea using my latest pouch tutorial (Version 4).  I created this camping bag.  I thought it would be really fun to stuff with things like a flashlight, bug spray, sunscreen, wet wipes, etc..  I have a lot of friends who enjoy camping and this will make a perfect gift.   They can hang it right in their campsite so everyone has all of the necessities right at their fingertips!  Cute, right?!!

If you missed my tutorial, you can find it here.

Happy Camping!

It’s Placemat Pouch VERSION 4!

I cannot believe how much of a response I’ve gotten to the Placemat Pouches! You guys are so amazing!  I had to come up with another version for you!  I give you.. Version 4!

Placemat V4-1

Isn’t she cute!!!

Placemat V4-8.jpg

I can see all kinds of uses for this little cutie patootie!  On the go diaper bag, perhaps?  Or a cute little purse?  What about a grab and go beach pouch?  It’s a great size and made from another quilted placemat, so the extra padding makes it ideal for all kinds of “Stuff” you need to carry around.

This slideshow requires JavaScript.

They just might be my new favorite!

Ready for the tutorial?  I’ve got it linked below along with a list of all of the materials:

Measurements:
14″ or bigger zipper
3 x 11 Piece of coordinating fabric
4 x 12″ Piece of coordinating fabric
(2) 1″ strips of heat n bond heavy interfacing


DIY Placemat (for Zipper Pouches)

Hello!  I’m so happy you are here!

I have a really easy project for you.  Due to the overwhelming response I’ve had to the

Placemat-1

Placemat pouch tutorials, I thought you might enjoy a DIY placemat, so that you can use your own beautiful fabrics.

Placemat-3

This is a really easy, basic placemat.  I will show you how to add your own “cheater binding” so that you can add the pop of color around the zipper (red polka dot in the photo above).

I do recommend one change from the video.  This placemat is not quilted due to the way it is made.  Therefore, I would highly recommend adding Heat N Bond Craft Interfacing to the lining.  In the tutorial I show you how to add the fusible fleece to the outer fabric.  I recommend using both the fusible fleece on the outer and the interfacing on the lining.  This will provide a stiffer, crisper pouch.

Placemat-5

I also linked a video to bind the placemat around all four sides in case you really want to use this as a binded placemat.  You can absolutely leave it with no binding as well.  A lot of different options for a lot of different looks.

Are you ready for the tutorial?

Products used in Video:

Heat n Bond Fusible Fleece: http://shrsl.com/w3d5

OPTIONAL:
HeatnBond Extra Firm Fusible Interfacing: http://shrsl.com/ukgy
Heatnbond Extra Firm Fusible Interfacing (Amazon Link):
https://amzn.to/2pYt66F
Pilot Frixion Fushion Pens: https://amzn.to/2DP2usR
Wonderclips: https://amzn.to/2pDfDQI
3” Quilting Ruler: https://amzn.to/2I1RICc
Singer Quantum Sewing Machine: http://amzn.to/2IxpErn

Disclaimer:  Links above are affiliate links.  By clicking on these links I may make some change at no cost to you.  Some products may have been provided to me by vendors, however, all opinions and reviews are strictly my own.

How to bind a quilt: https://youtu.be/cGOIAnc0_M4

Social Media Info

Facebook: https://www.facebook.com/lanunemaker

My blog: http://www.lorriesstory.com/

Pinterest: https://www.pinterest.com/lanunemaker/

Instagram: https://www.instagram.com/lorrie_nunemaker/
Measurements:
(2) pieces of fabric 15 x 20″ (My fabrics are from Joanns)
(1) piece of fusible fleece 14 x 19″ – Linked above
(1) piece of interfacing 14 x 19 (OPTIONAL) – Linked above


Placemat Pouch Version 3

Hello and welcome!  Today I have ANOTHER placemat project for you.  These placemat projects have had an enormous following and I could not be happier about it.  They are so quick and easy to put together and the hard part (the quilting) is already done for you!

Placemat Bag Part 2-2

Today, we are making this upright version.  This could be perfect for a make up bag, a lunch bag, an “essentials” travel bag or even just a cute tote or pouch for storage.

Placemat Bag Part 2-3

The boxy shape and raised zipper make it extra roomy and easy to get in.

Placemat Bag Part 2-3-2

I lined this one with Thermoweb Iron On Vinyl which gives the inside a wipeable, waterproof lining.  The handle uses Thermoweb Extra Firm Fusible Interfacing to give it extra sturdiness and durability. IMPORTANT NOTE: handle interfacing should be cut to 2″ x 14″, not 4″ x 14″ as stated in video. All of the correct measurements are in the video description.

Placemat Bag Part 2-1-2

I think these are a fun edition to the Placemat Zipper Pouch (Version 1), the placemat wallet, the placemat basket and the placemat square pouch (Pictured below).

Ready for the tutorial (you knew I had one ready for you!):

Placemat Zipper Pouch

Pioneer WOman Pouches-1

This, by far… has been one my most popular video tutorials and, probably one of the easiest!

This is a Box Zipper Pouch made from a Pioneer Woman Placemat from Walmart!  Not even joking!

Pioneer WOman Pouches-5

These are really practical.  They are the perfect size for cosmetics, traveling toiletries and even craft projects.

The best part… the quilting is already done for you.  All you need to do is add a zipper and few stitches and voila… you’ve got a gift in less than 15 minutes.

Want to make one?  Guess what?  I’ve got a video tutorial for you!  Here you go!