How to make a face mask

masks

Hello there.  Doug asked me to make a couple of face mask to have on hand in the event that we need them.  I posted them in my Facebook Groups and immediately had a ton of requests to make a tutorial.  I am posting the tutorial of these masks with the disclaimer, I followed THIS PDF tutorial which was recommended by a hospital.  I do not know the exact effectiveness of the face mask, but I do know, it provides an added layer of protection.

I have also provide a Cricut Design Space file for those of you who have a Cricut Maker.

You can find the Cricut Design Space ADULT Size File by Clicking HERE. You can find the Cricut Design Space CHILD by Clicking Here.

For those who do not have a die cutting machine, you don’t need one.  This is two simple rectangles that can easily be cut by hand.

Please do your research. This is not a protection from the Corona VIrus. This is simply an added barrier between you and the outside world. Visit the CDC website for the best way to protect yourself from the Virus.


Here is the Tutorial:


How to make a Planner Pouch

DSC_0013

Hey there!  Thanks for stopping by! I had a few requests over in my Craft Crazy Facebook Group to create a tutorial for a planner pouch.  I grabbed my planner and got busy creating what I felt was a perfect size, but you can easily adapt it to fit your planner.

DSC_0001

I think it’s super practical and not just for planners.  Journal writers, students and list makers would also enjoy a pouch.  Keeping all of your planner stickers, writing utensils, clips, erasers, etc. with your notebook has never been easier, or prettier.

DSC_0003

This is a beginner sewing friendly tutorial. Don’t let the zipper scare you, I am going to walk you through it step by step… it’s easier than you think!

I would love it if you would tag me on social media when you make theplanner pouch.  You can find me by clicking here 

If you have a Cricut, I have a Design Space file so you can let the Maker cut the fabric and interfacing for you.  CLICK HERE FOR THE DESIGN SPACE FILE.

Are you ready to get started?  Here’s the tutorial:

How to Make Envelope Pillow Covers

southbendpillowThis has got to me the EASIEST sewing project, ever!  Not only is it very beginner friendly, but it’s so practical.  With this tutorial you can virtually create unlimited amounts of personalized pillows and personalized gifts.  My friend, Karen Runge, showed me a similarly designed pillow and encouraged me to make a tutorial.  I used the Cricut EasyPress and Iron on to create my design.  You could also use this tutorial to  create a blank for Infusible Ink, Embroidery, fabric pens and fabric markers.  So many possiblities.

Let’s get right to the tutorial.  You are going to want to make pillows for all of your friends and family.  (Psssst.. these would make perfect holiday gifts!)

Parkside Tote – Collaboration with OklaRoots

parkside1

I have been so excited to release the Parkside Tote Bag.  OklaRoots and I collaborated on this super fun, super practical tote bag.

IMG_6053

We are both bag makers.  She is also a quilter – I want to be a quilter.  Neither of us have the time to commit to a full size quilt everytime we want to quilt, so we decided to combine our two loves and voila… the Parkside Tote was built.

Jess over at OklaRoots designed the quilt block just for you.  It is perfectly sized and pieced together to fit within the construction of this tote.  You can visit her blog and Youtube to find out how to make the quilt portion of the bag, pick up the PDF templates and she’s even got SVGs for all of you digital die cutting makers.

IMG_3399Then stop back here and I’ll show you how to construct the bag.  I’ve got a PDF for you with all of the dimensions for the fabric portions of the bag.  You can get it HERE.

parkside4

There is so much room inside of this bag.

parksdie3

I bet you can’t just make one!!!IMG_4937.jpg

So, grab some fabric, vinyl, cork or whatever your preference is, and let’s get started!

Let’s Make Velvet Pumpkin

IMG_5870.jpg

Who says pumpkins need to be orange?  Not me!  I wanted a little color in my fall decor and decided to add it to the pumpkins.

IMG_5873

I absolutely love it!  These are the cutest!!!  I had a lot of leftover stretch velvet left from the Urban Scrunchies and this was the perfect use for it.

Here’s a step by step tutorial for you:

Brinkley Double Zipper Pouch / Cross Body Bag

IMG_5800Thanks for stopping by!  I am so excited to share with you the Brinkley Double Zipper Pouch / Cross body Bag.  This is a fun and practical bag.  It features two zipper pockets

IMG_5792

as well as a surprise third pocket in the middle.  It’s super roomy.  I can easily fit my iphone XS Max inside the smaller pouch with plenty room to spare for keys, wallet, etc.

IMG_5807

I made two different sizes.  The smaller size is approximately 6 x 8 and the larger is 8×10.

IMG_5821

I love that you can easily switch between a clutch to a cross body bag by simply changing the detachable strap.

The measurements are as follows:

2 Outer Fabrics 8″ x 10″ (small size 6 x 8) .

2 Lining Fabrics 8 x 10 (small size 6 x 8)

2 Fusible Fleece cut to 7.5 x 9.5

1 Fabric for wristlet strap 3″ x 15″ (lengthen or shorten to your preference)

1 Fabric (or vinyl) 2 x 4″ for tab

1 D-ring / 1 Swivel Lobster Clasp

I will be making several of these for Christmas gifts.  Are you ready to make one (or three?).  Get your zippers, some cute fabric and your favorite beverage and let’s get making!!  Here is a step by step tutorial for you:

Triangle Jelly Pouches

IMG_5641

I had an idea in the middle of the night and could hardly wait until it was time to get up so I could give this a shot.  The Triangle Jelly Pouch!

IMG_5633
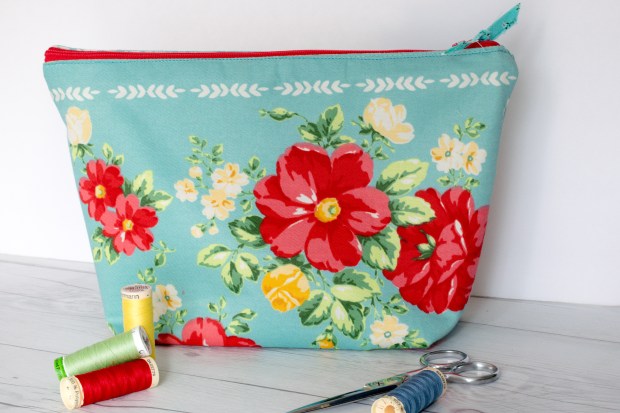
I had so much fun making the fully lined fabric pouches (you can find that tutorial here), that I thought what would be even more fun, than to create a clear version.

IMG_5632

I mean, seriously, how cute would these be hanging off a backpack, or even just stuffed with treats.  I would totally use that purple one and fill it with Halloween Goodies for the kids.

IMG_5633

You could also make these out of faux leather or vinyl for another look.  Check out one of my favorite shops on Etsy called Sew Hungry Hippie.  She’s got so many fantastic selections of vinyl and faux leather.

Are you ready for the tutorial?

The Ashley Tote Bag

Ashley-Tote-YT

Hi there!  Over in my Craft Crazy with Lorrie nuneMAKER Facebook Group I posted a bag similar to this quite awhile ago.  It was this bag:

IMG_5139 2

and boy did I have a lot of request to make a tutorial.  Life got in the way… my son got married.  I have been so busy with wedding planning, guests every weekend, that I just didn’t have time to create a tutorial.

I did, however, take the time one afternoon to make a mock up so that I could get the dimensions down.  I came up with this tote:

IMG_5147 2.jpeg

Today, I finally had a chance to take a little bit from each bag and change it up just a little more and create the “Ashley” tote.  I love it so much.

Ashley Tote-4

The fabric makes me happy and the quilting just gives me all the feels.

Ashley Tote-6

Green and white polka dot?  I mean, c’mon!

Ashley Tote-5

Of course, I have a step by step tutorial for you.  You can find it below.  I have written down all of the dimensions for you.  You can get them in my shop HERE.

Here’s the video tutorial:   

Placemat Pouch Version 10! – The Tote

This is going to be a really quick post.  I started the Placemat Pouch Series over a year ago and the response has been overwhelming.  There are now 10 different placemat projects.

Today, I launched the newest member – Version 10 – The Tote.

Placemat 10

I am really happy with how this one turned out and I think the faux leather opens up a bunch of possiblities with the Placemat projects.  I’ve already got a few others lined up.

You can find the Step By Step Tutorial Here:

If you’d like to check out the other 9 placemat projects, CLICK HERE FOR A FULL PLAYLIST ON MY YOUTUBE CHANNEL

IMG_0437

Placemat V4-8

Placemat-3

Fabric labels-5-2Pioneer WOman Pouches-2Tool-Caddy

PW Cosmetic (1 of 1).jpg

Let’s make a rope rug!

You guys!  I am so excited and happy about this project!  It was so fun to make and I love the quirkiness of it and the unexpected surprise when you turn it over.  This is made from clothesline rope and some fabric scraps and a little help from my sewing machine and that’s it!

Rope Rug-4I love how amazing this looks from the front, but what I love even more is the backside!  It’s even better than the front, in my opinion.

Rope Rug-10

Look at all of those wonderful fabric scraps and the whimsical look just makes me smile from ear to ear.  Pretty powerful for a rug, don’t you think?  🙂

Rope Rug-16

I made this one originally as a rug, but look how cute it looks as a tablerunner.  You could create coasters, mug rugs, chargers, trivets and any other countless possibilities.

Rope Rug-1

I know you will want to give this a try and guess what?  I’ve got a step by step tutorial for you.  You can’t believe how easy it is!  But, first things first….

Rope Rug-12

I can’t take credit for this wonderfully, unique idea.  Natalie from SewHungyHippie graciously allowed me to share her idea with you.  You should run and check out her site!  She’s got a ton of amazing products like clear vinyl, glitter vinyl, halographic vinyl, faux leathers, patterns, tutorials and so much more!  I found her while searching for vinyl for my clear vinyl series on my Youtube Channel.

So…are you ready for the tutorial?  Here you go!