

In this example I used a 3d Puff Font called Varsity. You can get it here. It’s from Creative Appliques.

Check out the video below for all of the instructions and details.
In this example I used a 3d Puff Font called Varsity. You can get it here. It’s from Creative Appliques.
Check out the video below for all of the instructions and details.

Hey there! Thanks for stopping by! I had a few requests over in my Craft Crazy Facebook Group to create a tutorial for a planner pouch. I grabbed my planner and got busy creating what I felt was a perfect size, but you can easily adapt it to fit your planner.

I think it’s super practical and not just for planners. Journal writers, students and list makers would also enjoy a pouch. Keeping all of your planner stickers, writing utensils, clips, erasers, etc. with your notebook has never been easier, or prettier.

This is a beginner sewing friendly tutorial. Don’t let the zipper scare you, I am going to walk you through it step by step… it’s easier than you think!
I would love it if you would tag me on social media when you make theplanner pouch. You can find me by clicking here
If you have a Cricut, I have a Design Space file so you can let the Maker cut the fabric and interfacing for you. CLICK HERE FOR THE DESIGN SPACE FILE.
Are you ready to get started? Here’s the tutorial:
 Thanks for stopping by! I am so excited to share with you the Brinkley Double Zipper Pouch / Cross body Bag. This is a fun and practical bag. It features two zipper pockets

as well as a surprise third pocket in the middle. It’s super roomy. I can easily fit my iphone XS Max inside the smaller pouch with plenty room to spare for keys, wallet, etc.

I made two different sizes. The smaller size is approximately 6 x 8 and the larger is 8×10.

I love that you can easily switch between a clutch to a cross body bag by simply changing the detachable strap.
The measurements are as follows:
2 Outer Fabrics 8″ x 10″ (small size 6 x 8) .
2 Lining Fabrics 8 x 10 (small size 6 x 8)
2 Fusible Fleece cut to 7.5 x 9.5
1 Fabric for wristlet strap 3″ x 15″ (lengthen or shorten to your preference)
1 Fabric (or vinyl) 2 x 4″ for tab
1 D-ring / 1 Swivel Lobster Clasp
I will be making several of these for Christmas gifts. Are you ready to make one (or three?). Get your zippers, some cute fabric and your favorite beverage and let’s get making!! Here is a step by step tutorial for you:

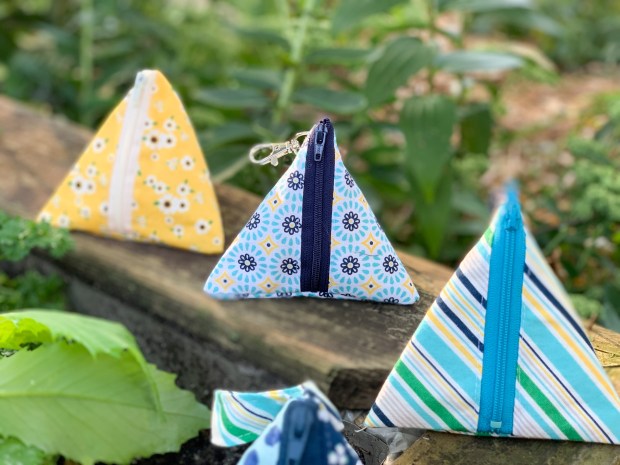
I had an idea in the middle of the night and could hardly wait until it was time to get up so I could give this a shot. The Triangle Jelly Pouch!
 I had so much fun making the fully lined fabric pouches (you can find that tutorial here), that I thought what would be even more fun, than to create a clear version.

I mean, seriously, how cute would these be hanging off a backpack, or even just stuffed with treats. I would totally use that purple one and fill it with Halloween Goodies for the kids.
You could also make these out of faux leather or vinyl for another look. Check out one of my favorite shops on Etsy called Sew Hungry Hippie. She’s got so many fantastic selections of vinyl and faux leather.
Are you ready for the tutorial?
 Triangle Pouches are super fun to make and they look harder than they really are. It’s really just a few straight seams and you’re done.
I looked around at Pinterest and Youtube and couldn’t find any tutorials showing how to fully enclose all the of the seams in the lining. I really love the simplisity of the patterns I saw on Pinterest, but I didn’t love seeing the raw edged seams on the lining. I wanted the inside to be as pretty as the outside.

So, I created my own tutorial with a completely finished linining. It’s really not hard at all and only adds 2 extra steps.

They turned out great and I can’t wait to give a few to some friends. They are also the perfect STOCKING STUFFER size! You could add a chapstick, handsanitzer or something fun and stuff them into the stocking or even hang them from the stocking. So many ideas.
Are you ready for the tutorial and to find out how I enclosed all of the seams? Here you go!

Hi there! I am happy you are here. It is a beautiful Sunday evening here in South Bend, IN and I just finished whipping up a few of these Double Zipper ID Pouches.

I used my Cricut Maker (you can use the Cricut Explore, too) to cut the Cricut Faux Leather, fabric and even the clear vinyl window.

I created this pattern with travel in mind, whether it’s a simple as a trip to the grocery or travel through an airport. It’s got a secure pocket for your ID and a larger, middle pocket for cash, keys or whatever you may need.

You can use the handy side clip to add a wrist strap, or to hang on a bookbag, tote bag, keys, etc.
I think this is going to be another great stocking stuffer idea!!
I’ve got a Cricut Design Space file for you so you can get started creating right away. Click here to get the Design Space FIle .
If you don’t have a Cricut (you need one), I’ve got a PDF for you. You can grab it HERE.
Now.. here’s the step by step tutorial:

Alright guys! I’m back with another clear vinyl pouch! This is a really fun project and really easy! There are so many possibilities using this technique, your Cricut and a little bit of vinyl. You can create a shaped pouch for virtually any shape!
The kids are sure to love them! Watch the step by step tutorial over on my youtube channel!

You guys! I have been laying in bed at night dreaming of vinyl bags! I am having so much fun working with this clear vinyl. I have an entire series coming up with lots of fun ideas and ways to use it.

Today, we are going to start with this very basic simple pouch. I think it is super cute and I can think of a million uses.
I used the Cricut to add a bit of fun personalization and I think it takes the cuteness factor over the top!
Find out everything you need to know to create your own in my YouTube tutorial here:

Hey there! I wanted to pop on here really quickly and share with you a fast and easy project using more of the paint drop cloth that I used in the previous RAE DUNN INSPIRED PILLOW COVER Tutorial and also in the SHABBY FABRIC BASKET Tutorial. (Click to visit those block posts).
This $4 drop cloth is providing me with fabric for tons of projects! This zip pouch is perfect for personalization (think EasyPress Iron On).
If you’re a Cricut user I even have a Design Space pattern for you. You can get that HERE.
If you’re not a Cricut user, don’t worry, I cut this project by hand in the video and you can, too!
Watch the video and check out the fun lining and pop of color on the inside!

Hello and thanks for stopping by! Today, I am excited to share this fun continuous zipper pouch. What does that mean? Let’s take a closer look.

Notice the continuous zipper with no end? Isn’t that super fun? I love it. This little boxy pouch is perfect for so many things.


You can make them most any size. Hello, lovely Easter Pouch.

Reach into the scrap fabric pile and create something a little more patchworky… is that a word?
No matter how you mix it up, you will find tons of uses for these unique little gems.

I’ve got all of the directions and sizes included in the video below. If you have a Cricut Maker you can even grab the Design Space File HERE. No Cricut? No worries, I’ve got you covered. You can easily cut this by hand.
Here’s the step by step tutorial and all of the information you need to make one of your own today!